

We have a great special on our Starter Kit this month and I wanted to share! I am blessed to lead an amazing team with members all across the United States. My team consists of both business builders and happy shoppers! The question I am most often asked about joining the SU family is – “do I have to sell?” The answer is no!
You are welcome to be a happy shopper – and a smart cookie, I might add- to get all the products you love at the demonstrator discount!
Please contact me with any questions! I’d love to have you join my “We’d Rather Bee Stampin'” team!
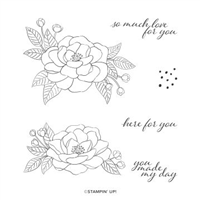
In addition to the regular starter kit (for $99 choose $125 worth of products), anyone who joins the Stampin’ Up! family in September will also receive enough cardstock pieces to make 16 cards, a pack of Rhinestone Basic Jewels, the So Much Love stamp set, and the Queen Anne’s Lace stamp set—ALL FOR $99 + Tax!
Below are the cards created with the supplies and tutorials that come with the Get & Go Starter Kit Promo! They are, of course so much better in person, but I do love the bright, vivid colors! They pop! These are colors I ordinarily wouldn’t choose – but I love them!


I decided to create a card of my own in a softer palette by using a Whisper White background. This is basically the same as the card above (upper left hand corner), but I stepped it up a bit. I added some texture with an embossing folder, added a scallop border, cut from the peony dies. Just stepped up a bit – which is your favorite? I’m not sure which is my favorite – I really like them both!


Measurements:

- Whisper White: 4 ¼ x 11 scored at 5 1/2, 4 x 5 1/4 embossed layer
- Pool Party: 3 x 4
- Bermuda Bay: 1 x 4
- Daffodil Delight: 3/4 x 2 1/4
1) Start with a Whisper White card base.
2) Emboss the White Panel with the Tasteful Textile Embossing Folder, adhere to card front with Stampin’ Seal
3) Use a Misty Moonlight ink and stamp a large and a small floral image onto the Pool Party panel
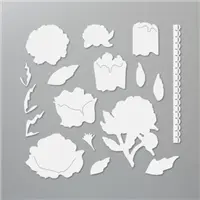
4) Use the Peony Die -(scallop edge) to crop the Bermuda Bay cardstock, and adhere to the back of the Pool Party panel
5) Attach to card front with Stampin’ Dimensionals
6) Use the Misty Moonlight ink to stamp greeting onto the Daffodil Delight strip and attach to card front with Stampin’ Seal.
7) Embellish with Rhinestones.


Need stamping supplies? I would bee GRATEFUL for your orders! You can order in my online store or email me if you need my help.


0 Comments