

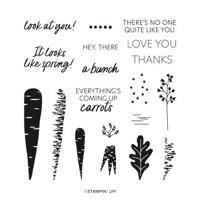
CARROTS! Today’s card uses Thanks a Bunch, a stamp set that can be earned for FREE with a $50+ order during Sale-a-Bration! Ends Feb. 28.

Measurements:
- Pumpkin Pie card base: 4 ¼” x 7 ¼” scored at 5-1/2” then burnished with the Bone Folder, 2 ¼” x 4 ¼”, 3” x 4 ¼”
- Basic White: 2 ¾” x 4”, 4” x 5-1/4”
- Designer Series Paper: 1 ½” x 4”, 2” x 4”
- Ribbon: three 12” strands
Instructions:
- With Multipurpose Liquid Glue adhere Designer Series Paper to small folded flap on card base and onto 4-1/4” x 2-1/4” Pumpkin Pie piece.
- Stamp four carrots with Pumpkin Pie onto Basic White piece. Start second from left at an angle and just left of center then stamp right of center carrot then far left then far right. Stamp your first carrot so it’s close to the bottom of the card stock. Carrots will all overlap at the top to fan them out.
- Cover carrot tops just to their edge with a Post-It Note then stamp three fuller leaves in Parakeet Party. Next, stamp the narrower branch pieces in Garden Green. Remove Post-It Note. Stamp sentiment with Soft Suede.
- Adhere Basic White carrot piece to Pumpkin Pie layer.
- Align separate Designer Series Paper piece so it lays right on top of the card base along the bottom edge. Add Multipurpose Liquid Glue to the top and bottom back areas of the carrot piece then carefully add it to the card base and loose Designer Series Paper piece. Readjust quickly, if necessary, before glue dries.
- Using your Take A Pick Tool, lift three gold Pastel Adhesive-Backed Sequins and add to card front.
- Holding all three strands of Linen Thread together, tie bow, attach to card with Mini Glue Dot, and trim ends with Paper Snips.
- With Multipurpose Liquid Glue, add Basic White piece to inside of card base.

![]()


0 Comments