

I love the Stars At Night Embossing Folder! It gives every project so much more depth and dimension with one run through a Stampin’ Cut & Emboss Machine.
UPDATED REGISTRATION CLOSE DATE! My Stars at Night class will be closing tomorrow, November 7 at 12 PM ET! Register before then so you don’t miss out!
 Dimensions:
- Night of Navy card base – 4 1/4 x 11, scored at 5 1/2
- Night of Navy Embossed Layer – 3 1/2 x 4 3/4
- Night of Navy Snipped Sentiment – 3 1/4 x 1 3/4
- Basic White Layer – 3 3/4 x 5
- Basic White – Scraps (small stars)
- O Holy Night Designer Series Paper – 5 3/4 x 2 1/4 (Envelope Flap)
 Instructions:
- Burnish the fold of the card base with a Bone Folder.
- Adhere the white layer to the card base with Stampin’ Dimensionals.
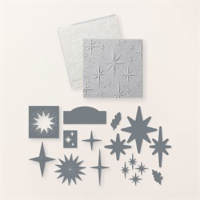
- Tuck the Night of Navy layer inside the Stars At Night Embossing Folder and run through a Stampin’ Cut & Emboss Machine.
- Adhere to the white layer with Multipurpose Liquid Glue.
- Use the Stars at Night dies to crop the small white stars. Adhere with Stampin’ Dimensionals and Multipurpose Liquid Glue.
- Stamp the sentiments in Versamark Ink onto the Night of Navy piece. Cover with white Embossing Powder. Set with a Heat Tool.
- Snip the sentiments closely with Paper Snips. Adhere with Mini Dimensionals.
- Embellish with Iridescent Pearls and Loose Silver Sequins.
- Adhere the Designer Series Paper the a Basic White Medium Envelope Flap.


UPDATED REGISTRATION CLOSE DATE! This class will be closing tomorrow, November 7 at 12 PM ET! Register before then so you don’t miss out!
Don’t miss this class – the cards are stunning – you will be creating some very special cards!
REQUEST TO REGISTER BELOW!
Please email me with any questions!
VIEWING THIS POST BY EMAIL? To register, please EMAIL ME for a registration link!


![]()


0 Comments