

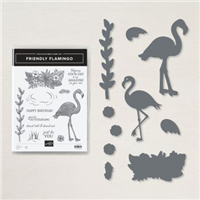
I will be sharing projects using the Friendly Flamingo Bundle this week – and to start, here are two cards I made yesterday on my Facebook Live. These flamingos just make me happy – they are fresh and fun! If you missed my Facebook Live, you can watch the replay below!

First up was a super simple card – I used the largest die in the Stitched with Whimsy Dies set- don’t miss them in the January – June catalog – they are a great and easy way to add some detail to your cards.
For the flamingos, I used Flirty Flamingo cardstock and for the center flamingo, I used my favorite polka dot pattern of Flirty Flamingo in the 6 x 6 Designer Series Paper Assortments – Brights. These paper assortments are all retiring – I am going to miss this polka dot pattern!


MEASUREMENTS: Card One – You’re Outstanding
- Basic White Thick – 8 1/2 x 5 1/2, scored at 4 1/4;1/2 x 2 for word panel
- Pieces of Flirty Flamingo Cardstock and Flirty Flamingo Polka Dot pattern from the Brights DSP Stack
- Small pieces of Basic Black cardstock for eyes
INSTRUCTIONS:
- Use the largest Stitched with Whimsy Die to add some stitching to the card front.
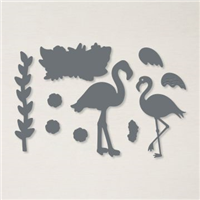
- Crop the three flamingos and wings with the Flamingo dies with the Stampin’ Cut and Emboss Machine.
- Use Tombo Liquid Glue to adhere a small piece of Basic Black cardstock onto the back of the flamingos – for the eyes.
- Adhere flamingos to card front with Tombo Liquid Glue. Add wings with Stampin’ Dimensionals.
- Stamp words with Tuxedo Black Memento Ink onto the word panel and use paper snips to angle the end.
- Tie a bow with Black and White Baker’s Twine and adhere behind words with a glue dot.
- Position word panel/bow onto card front with a dimensional. Tip: the “bulk” of the bow will raise the left side of the word panel enough that a dimensional won’t be needed on that end. You’ll only need to use a dimensional on the right-hand side of the word panel. Quick and easy card!

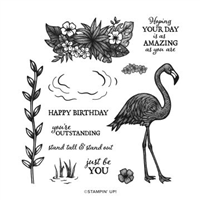
For the second card, I stamped the flamingo with Flirty Flamingo Ink onto a piece of Basic White cardstock and cropped it with the coordinating die. I love all the detail in this flamingo stamp! I wanted to create a feel of the tropics and pull in some greenery, so I used the retiring Forever Greenery DSP.
MEASUREMENTS: Card Two: Hoping Your Day is as Amazing as You Are
- Flirty Flamingo- 5 1/2 x 8 1/2, scored at 4 1/4
- Basic White: 4 x 5 1/2 for rectangle; 4 1/4 x 3 for flamingo; inside panel 4 x 5 1/4
- Forever Greenery DSP: striped piece 3 1/2 x 3/4; two strips for the leaves.
INSTRUCTIONS:
- Stamp the flamingo onto the Basic White panel and crop with coordinating die. Crop the Stitched Rectangle from the Basic White panel.
- Adhere the Basic White panel to the inside of the card.
- Use two strips of the Forever Greenery DSP in pattern shown in photo and cut two of the leaf/stems.
- Adhere the striped piece of DSP to cardfront with Stampin’ Seal.
- Use Tombo Liquid Glue to adhere the leaves to the stitched rectangle. Adhere Flamingo with Mini Stampin’ Dimensionals.
- Adhere the Rectangle panel to the card front with Stampin’ Seal or Tombo Liquid Glue.
- To finish the card, embellish with three Elegant Faced Gems. I used the pink – but any of them would work.

![]()


Sale: $10.35
Price: $11.50


0 Comments