Jan 24, 2025 | Gallery, More Friend Cards |

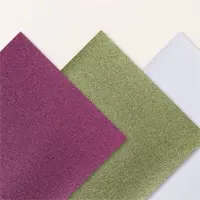
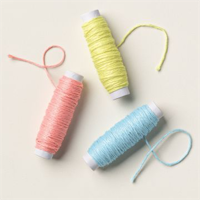
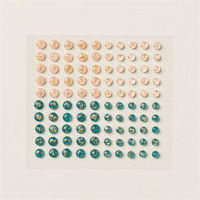
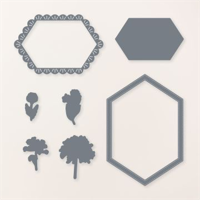
Have you seen the new Stampin’ Up! Mixed Media Florals Suite Collection? It’s part of the recently released Online Exclusives, and let me tell you—it’s absolutely stunning! This collection is packed with so many fabulous products, you’re going to fall in love at first sight!
Stampin’ Up! Mixed Media Florals Suite Collection


Dimensions:
- Basic White Thick card base – 4 1/4 x 11, scored at 5 1/2
- Mixed Media Florals Designer Series Paper – 4 x 5 1/4
- Basic White Cardstock – 4 1/4 x 4 1/2 (circle), 5 1/4 x 4 (florals), 4 1/4 x 1 1/2 (sentiment)

Instructions:
- Burnish the fold of the card base with a bone folder.
- Adhere the Designer Series Paper to the card base with Multipurpose Liquid Glue.
- Crop the Basic White layer with the 4th largest (4 inches) Around it All die. Adhere with Stampin’ Dimensionals.
- Stamp the floral image, banner and sentiment in Tuxedo Black Memento Ink onto the Basic White layer. Crop with the coordinating Mixed Florals dies.
- Color the floral image with the following Stampin’ Blends Combo Packs: Soft Sea Foam, Old Olive, Calypso Coral, Petal Pink, Boho Blue
- Adhere the cropped pieces layered as shown with Stampin’ Dimensionals.
- Embellish with Low-Profile Dots.


FREE TUTORIALS- I send out Weekend Inspiration every weekend that includes a handful of Card Projects with tutorials and supply lists – and yes they are free! The first card on today’s post is one of the project tutorials! I send these out to all who are on my email list. Interested in getting these project sheets? Simply subscribe to my email list click here:


Jan 23, 2025 | Gallery, More Birthday Cards, More Friend Cards |
Yesterday on my Facebook Live I created four cards featuring the Beautiful Butterflies bundle. It’s so pretty!
If you’d like the measurements for these cards, they can be found on the FB Live recording!
The first card was made with a Fresh Freesia color palette. I also added some background details with a new stamp set called Elements of Cling – I love these kinds of stamp sets as they are a subtle way to add some interest to the layers of the card. I created the ring frame on this card by using two fo the Spotlight on Nature circle dies.
The second card is a fun layout – I cut down the front panel of the card and created a smaller flap. I used two of the Stylish Shape circle dies to agian create a frame. – I glued them together and adhered just the bottom to my card front.
I cut four of the small butterfly die cuts and adhered to on the front of the circle frame, and two on the back side – this makes the inside panel look complete.
My third card was a butterfly shaped card – just a fun card to make and send off to a friend! This bundle has become a favorite of mine and hope you will give it a try as well!
FREE TUTORIALS- I send out Weekend Inspiration every weekend that includes a handful of Card Projects with tutorials and supply lists – and yes they are free! The first card on today’s post is one of the project tutorials! I send these out to all who are on my email list. Interested in getting these project sheets? Simply subscribe to my email list click here:

Dec 17, 2024 | Gallery, More Friend Cards |

Here’s a sneak peek (available January 7)! The 2025 Spring Mini Catalog and Sale-a-Bration promotion are almost here! I’ve been having a blast trying out the new products, and I can’t wait to share what I’ve created to inspire you. This card was created with the NEW Stampin’ Up! Terrific Toadstools Bundle and the coordinating Sale-a-Bration Gift (with $60 Purchase) Stampin’ Up! Toadstool Gardens 6 x 6 Designer Series Paper.


Dimensions:
- Melon Mambo card base – 4 1/4 x 11, scored at 5 1/2
- Basic White Embossed Layer – 4 x 5 1/4
- Basic White – 2″ Circle, 3 x 1 (sentiment), 3 1/2 x 1 1/4 (punched toadstool), 1 x 2 (snipped stem)
- Toadstool Gardens Designer Series Paper – Qty 4 – 1 x 4 strips
- Melon Mambo Cardstock – 1 3/4″ Circle

- Burnish the fold of the card base with a bone folder.
- Emboss the Basic White layer with the Fern 3D Embossing Folder. Adhere to card base with Multipurpose Liquid Glue.
- Adhere the strips of Designer Series Paper.
- Use the 2″ and 1 3/4″ Circle Punches to crop the Basic White and Melon Mambo cardstock.
- Stamp the sentiment in Granny Apple Green. Snip the edge at an angle with Paper Snips.
- Adhere all three to the card with Stampin’ Dimensionals.
- Stamp the toadstool (Fresh Freesia) and stem (Smoky Slate). Crop the toadstool with the Terrific Toadstool Builder Punch. Snip the stem with Paper Snips. Adhere with Stampin’ Dimensionals.
- Adhere a bow of Garden Green Natural Tones Linen Thread with a Mini Glue Dot.
- Embellish with Melon Mambo Sunny Day Iridescent Dots.
FREE TUTORIALS- I send out Weekend Inspiration every weekend that includes a handful of Card Projects with tutorials and supply lists – and yes they are free! The first card on today’s post is one of the project tutorials! I send these out to all who are on my email list. Interested in getting these project sheets? Simply subscribe to my email list click here:

Sep 25, 2024 | Gallery, More Friend Cards |

I just realized I have not posted my FB Live from last week! I shared a clean and simple cards featuring the beautiful Artful Amaryllis Bundle. I love this bundle! Below is the video recording of my live:

My current Class to Go features this wonderful bundle! All the details are below – I would love for you to be a part of this class and sure would appreciate your registration! Don’t delay – this class closes on Friday!

My Bee-utiful class to go this month features the NEW Artful Amaryllis Bundle from the 2024 Holiday Catalog!
Don’t miss this gorgeous bundle!! The $35 Class includes the following products:
- 1 Each of 5 Different Card Designs
- 1/2 Package Regal Winter Designer Series Paper
- Regals Foiled Adhesive-Backed Dots
- Basic Beige Ribbon
Basic Class Fee is $35 – Add-Ons needed for this class are available at check-out!
Regular Registration Closes on FRIDAY, September 27 at 12 PM ET
Register for the Artful Amaryllis Card Class to GO!
Please email me with any questions!
FREE TUTORIALS- I send out Weekend Inspiration every weekend that includes a handful of Card Projects with tutorials and supply lists – and yes they are free! The first card on today’s post is one of the project tutorials! I send these out to all who are on my email list. Interested in getting these project sheets? Simply subscribe to my email list click here:

Jul 31, 2024 | Gallery, More Friend Cards, More Thank You Cards |
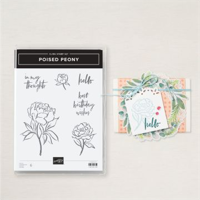
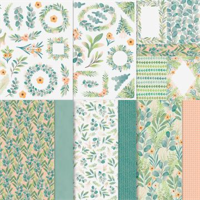
I created these during my most recent Facebook Live. I love the Frames and Flowers DSP package – and I used it on two of these cards. Combine it with the Poised Peony set and you have a perfect combo! Gorgeous colors and images! The words in the Poised Peony set are great as well!!
You can watch the replay here:

Here is the first card I created! It is super simple – I die cut a large circle from the Deckled Circle dies and placed it over a panel of Basic Beige cardstock. I used a Blending Brush with Lost Lagoon Ink to create the circle shape. Then all I had to do was stamp the large peony with Pretty Peacock ink, add my greeting and embellishments and I was done!

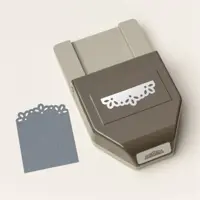
Next – this card features one of the MANY die cuts that are included in the DSP package. The tag is created with the Elegant Edge tag punch.

The third card also featured some of the die cuts from the dsp package. I added an embossed panel using the Distressed Tile embossing folder and a panel cut from the Perennial Postage dies.

If you love these projects, then I hope you will join us in August for my monthly Bingo/Crafting event! We have so much fun!!!

REQUEST TO REGISTER BELOW!
Please email me with any questions!

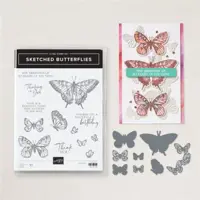
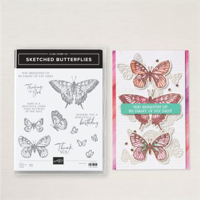
Jul 26, 2024 | Gallery, More Friend Cards, More Thank You Cards |
Today I am sharing a beautiful trio of cards featuring products from the new – Sketched Butterflies Bundle! The stamped and die-cut butterflies are all easy to work with and gorgeous. I create these during my most recent Facebook Live. You can watch the replay here:

Here is the first card I created! I love how the die-cuts set at a slight angle really show off the beautiful butterfly.

The second uses lots of white with texture and a nice pop of color with the butterfly and sentiment.

The little butterflies die-cut from the glimmer paper are perfect!