Feb 5, 2025 | Gallery, More Holiday Cards, More Love Cards |

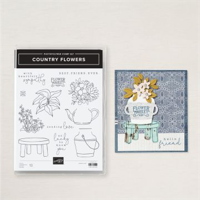
Today on my Facebook Live I created four cards featuring the Sale-a-Bration Pick a Season Stamp Set – Free with a $60 Purchase! It’s so versatile, a must-have for Valentine’s Day, Easter, Spring and St Patty’s Day!

Ordering Special! NOW – Sunday, February 9!
Orders of $35 or more will receive the kits to make the cards.
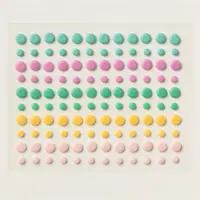
Orders of $50 or more will receive a pack of the In Color Resin Dots (2024-2026)
Details:
- No pre-stamped images will be included per SU! policy. Included will be all of the cardstock and DSP. You will need the Pick a Season Stamp Set to complete the cards!
- Minimum order of $35 must be placed by Sunday, Feb. 9, using the host code.
- If your order is $50 plus you will receive the dots.
- If your order is $60, you will receive a Sale-a-bration reward!
- Limit: 1 class packet per customer

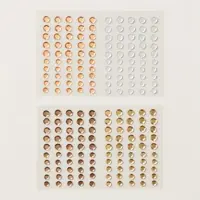
Here’s a closer look at the cards and what you will receive in your kits (note: stamped images are not included).
FREE TUTORIALS- I send out Weekend Inspiration every weekend that includes a handful of Card Projects with tutorials and supply lists – and yes they are free! The first card on today’s post is one of the project tutorials! I send these out to all who are on my email list. Interested in getting these project sheets? Simply subscribe to my email list click here:


Dec 19, 2024 | Gallery, More Christmas Cards, More Holiday Cards |

Create a stunning yet simple Merry Christmas card with the Greetings of the Season and Golden Green Bundles by Stampin’ Up!, both featured in the elegant Season’s of Green & Gold Suite Collection.
Card Tutorial: Greetings of the Season Christmas Card
Measurements:
- Basic Beige: 8 1/2” x 5 1/2”, 3 1/2” x 3/4”, 5” x 3 3/4”
- Old Olive: 5 1/4” x 4”
- Seasons of Green & Gold DSP: 4” x 1” (green), 4” x 2” (gold)
- Vanilla Twine: 12”
Instructions:
- Score Basic Beige cardstock to create card base.
- Adhere the green 4” x 1” piece of DSP to the front. Adhere the gold 4” x 2” piece slightly to the right over the edge of the green piece.
- Die cut the two sets of leaves from the Graceful Greenery Vellum. Adhere together and to the card front using Mini Glue Dots.
- Tie a bow with the twine and attach with a Mini Glue Dot.
- Stamp greeting of your choice with Cherry Cobbler ink. Trim and add to the front of the card using Dimensionals.
- Add three foil gems.
- Stamp the leaves from the Golden Greenery stamp set with Old Olive ink for the inside Basic Beige cardstock. Layer with the Old Olive cardstock for the inside. Stamp the envelope to match.


Dec 11, 2024 | Gallery, More Christmas Cards, More Holiday Cards |

Get ready to spread some festive joy with the NEW Stampin’ Up! Classic Wedding Bundle — featuring an adorable holiday card design with a car decked out in Christmas lights, piled high with gifts, and a cheerful ‘CHEER’ license plate!
Card Tutorial: Classic Wedding Holiday Card
Measurements:
- Thick Basic White – 5 ½ x 8 ½ scored at 4 ¼ on the 8 ½ inch side
- Basic White – 4 1/8 x 5 3/8, 3 x 3 ½ for car, 3/8 x 15/16
- Real Red – scraps for lights and bows and car back lights
- Garden Green – scraps for lights and present
- Granny Apple Green – scraps for lights and bow and present
- Designer Series Paper – 1 x 3 ¼ – 4 different patterns
- Silver Foil – scraps for window frame, light string, truck handle and bumper
Instructions:
- Fold and burnish card base with bone folder.
- Run the larger piece of basic white with the snowflake sky 3D embossing folder though the Stampin’ Cut and Embossing machine. Adhere to the front of the card.
- Stamp the outline of the car with memento ink and then stamp the fill in with real red.
- Do all your die cutting, the car, the presents, bows, silver pieces.
- Snip off the lights and adhere to the silver string of lights.
- Cut the presents with cardstock and DSP, adhere the bows to the presents as shown.
- Using multi-purpose glue, adhere all the silver to the car.
- Using the light basic black blend, color the tires.
- After adhering all the pieces to the car, adhere to the front of the card so that the tires are about 3/8 to a ½ inch from the bottom of the card.
- Put the completed presents on the top of the car using stamping dimensionals and glue.
- Stamp CHEERS! in real red, then cut off the S! and cut down to 3/8 x 15/16.
- Scatter the snowflake embellishments as desired.
- Finish inside and envelope as desired.

Dec 3, 2024 | Gallery, More Christmas Cards, More Holiday Cards |

This Good Shepherd’s Care Holiday Card in Pretty Peacock is a beautiful creation that showcases both elegance and heartfelt sentiment. The card features a soft and serene design with a combination of intricate stamping and layered elements.
Card Tutorial: Good Shepherd’s Care Holiday Card
Measurements:
- Pretty Peacock 8 ½ x 5 ½
- Designer Series Paper 5 ¼ x 4
- Gold Foil 2 7/8 x 4 1/8
- Basic Beiges 2 ¾ x 4
- Very Vanilla for stamping/cutting star
Instructions:
- Fold Pretty Peacock in ½ to create card base
- Wrap Twine around DSP and attach to card base
- Stamp shepherd on Very Vanilla with Basic Beige ink
- Stamp sentiment on Very Vanilla with Pretty Peacock Ink.
- Add Very Vanilla to Gold Foil and attach to card with Stampin’ Dimensional
- Tie bow with Gold Twine
- Stamp star on Very Vanilla in Crushed Curry and hand cut. Attach using Mini Glue Dots
- Add sequin

Oct 25, 2024 | Gallery, More Christmas Cards, More Holiday Cards |

How lovely is this winter scene created with the Snowy Wonder Bundle by Stampin’ Up!? The mixture of trees, mountains and different shades of green are the perfect backdrop for the little cabin nestled among them.
Card Tutorial: Snowy Wonder, Let it Snow Card
Measurements:
- Crumb Cake: 5-1/2” x 8-1/2” scored at 4-1/4”, folded then burnished with the Bone Folder (card base)
- Basic White: 5 ½” x 8 ½”
- Garden Green: ½” x 1 ½”
- Linen Thread: 8”
Instructions:
- Using Crumb Cake ink, stamp speckle images across the center, front of the Crumb Cake card base. onto the 4” x 5” piece of Basic Beige cardstock and heat emboss using the clear embossing powder.
- Using the large circle die from the Stylish Shapes Dies, die cut a circle from the Basic White cardstock close to an edge. Stamp Mountain images towards the top of the circle piece using Pool Party ink, then adhere to the front of the card base over the speckled images.
- Die cut a the triangular tree from the Garden Green cardstock.
- Stamp a variety of trees using Garden Green ink onto the remaining Basic White cardstock; stamp some with the “stamp off” method to get varying shades of green. Then stamp a cabin using Early Espresso ink and the sentiment using Crumb Cake ink.
- Die cut the trees and cabin using the Snowy Wonder Dies and fussy cut the sentiment. Then adhere the trees and cabin inside the circle die in layers using various adhesives, with the top most pieces using Stampin’ Dimensionals.
- Tie a bow with the Linen Thread, attach it to the back of the sentiment, and the sentiment/bow piece to the front using Stampin’ Dimensionals.
- Attach a few White Loose Snowflakes using the Fine Tip Glue Pen.

Aug 29, 2024 | Gallery, More Holiday Cards, More Video Tutorials |

ORDER THE GLASS MAT STUDIO – ITEM 163987! Place an order for the Glass Mat Studio (or a minimum $60 order if you already have it) with host code XY4P9PHM by this Sunday, September 1 and I will send you the following for FREE:
- Blending Brushes (3 Pack)
- Stampin’ Dimensionals (1 Pack)
- Sparkle Gems (1 Pack)
- Your order also qualifies for TWO FREEBEES! (That’s double the normal amount!)

Wednesday on my FB Live, I shared these four cards which all showed different ways to take advantage of the Glass Mat Studio while you are creating!

Please watch my FB Live recording below to see lots of different tips and ways to use the Glass Mat Studio!

This simple card showed the completely solid image I got when stamping the BEE and her wings on the Glass Mat Studio! Sometimes with solid stamps like this, it is hard to get a good solid image – well, the Glass Mat Studio to the rescue!!!! Look forward to some beautiful stamped images when you put the Glass Mat studio to use!

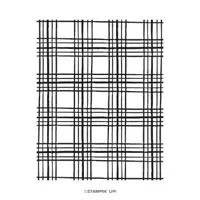
My next tip was using a large background stamp – for this card, I used the Sketched Plaid background stamp. No more struggling to hold the large block needed for these large stamps! It’s easy, peasy with the Glass Mat Studio!

Next tip – using the Silicone Mat that comes with the Glass Mat Studio to watercolor! I love to watercolor – I find it quite relaxing! Again- the Glass Mat Studio to the rescue – no mess – the reinker droplets and water are contained in the Silicone Mat – and then a simple wash in the sink cleans it out!

My final tip was how to use masks on the Glass Mat Studio. I used both ink and Shimmer Embossing Paste. So much fun with extremely easy clean up!

I hope you have learned some new things about how to use the Glass Mat Studio and will want to order it this weekend and take advantage of my great ordering special!