Aug 22, 2024 | Gallery, More Halloween Cards, More Holiday Cards |

GET THE CARD KITS ABOVE FREE! Place an order of $35+ with host code XY4P9HM by this Sunday, August 25 and I will send you the pieces needed to make 2 each of the cards above for FREE! Also included is a PDF with measurement that will be emailed to you when I send you your kit.

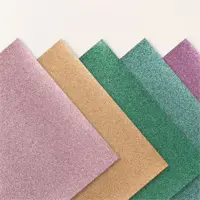
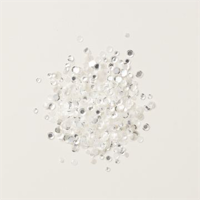
Place an order of $50+ and you will get both the pieces for the cards and the Sparkle Gems FREE (Limit One FREE Item Per Customer)!

Monday on my FB Live, I shared the above two cards featuring the Playful Ghosts Stamp Set! Thhis set is found online in my store!
I hope you will take advantage of my ordering special to get the card kits for free – AND with a $50 order, you will get the dots as well!!! Win Win!
You can watch how to assemble the cards below in the video here:

Here’s the first card.

For the second card

I hope you have enjoyed these two adorable Halloween cards and will take advantage of my ordering special!

Nov 6, 2023 | More Holiday Cards |

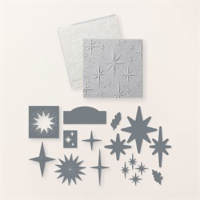
I love the Stars At Night Embossing Folder! It gives every project so much more depth and dimension with one run through a Stampin’ Cut & Emboss Machine.
UPDATED REGISTRATION CLOSE DATE! My Stars at Night class will be closing tomorrow, November 7 at 12 PM ET! Register before then so you don’t miss out!
 Dimensions:
- Night of Navy card base – 4 1/4 x 11, scored at 5 1/2
- Night of Navy Embossed Layer – 3 1/2 x 4 3/4
- Night of Navy Snipped Sentiment – 3 1/4 x 1 3/4
- Basic White Layer – 3 3/4 x 5
- Basic White – Scraps (small stars)
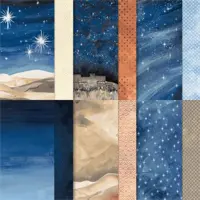
- O Holy Night Designer Series Paper – 5 3/4 x 2 1/4 (Envelope Flap)
 Instructions:
- Burnish the fold of the card base with a Bone Folder.
- Adhere the white layer to the card base with Stampin’ Dimensionals.
- Tuck the Night of Navy layer inside the Stars At Night Embossing Folder and run through a Stampin’ Cut & Emboss Machine.
- Adhere to the white layer with Multipurpose Liquid Glue.
- Use the Stars at Night dies to crop the small white stars. Adhere with Stampin’ Dimensionals and Multipurpose Liquid Glue.
- Stamp the sentiments in Versamark Ink onto the Night of Navy piece. Cover with white Embossing Powder. Set with a Heat Tool.
- Snip the sentiments closely with Paper Snips. Adhere with Mini Dimensionals.
- Embellish with Iridescent Pearls and Loose Silver Sequins.
- Adhere the Designer Series Paper the a Basic White Medium Envelope Flap.


UPDATED REGISTRATION CLOSE DATE! This class will be closing tomorrow, November 7 at 12 PM ET! Register before then so you don’t miss out!
Don’t miss this class – the cards are stunning – you will be creating some very special cards!
REQUEST TO REGISTER BELOW!
Please email me with any questions!


Oct 24, 2023 | More Holiday Cards |

I made a cute card on my Facebook Live this week featuring the Festive & Fun stamp set! I love the bright and cheery colors – and this stamp set is true to its name – Festive & Fun! I used the So Scalloped Contour Dies to create a scalloped edge on the front of the card. The Merry Bold & Bright is a perfect DSP to compliment this fun stamp set!
You can watch the replay here:

I used a small tag from the Tailored Tag set of dies for the inside of the card – and added a few gems.

If you love this stamp set then you will want to subscribe to my Bee Box Club – this month I am featuring the Festive & Fun stamp set – so you will get additional ideas for this stamp set! So cute – and fun! Details below to subscribe – you must subscribe by the end of the day on Oct. 25. Details below!

My Bee Box is now a SUBSCRIPTION CLUB – which means when you join, you can look forward to a package of crafty inspiration and goodness monthly!
THE OCTOBER SUBSCRIPTION CLUB CLOSES OCTOBER 25!
Please read the entire post for all the details on how to subscribe to the monthly kit and purchase the optional add-on products required to complete the kit. Feel free to email me with questions.
I am partnering again with my demonstrator friend, Sherry Roth to bring you an amazing club!
For $35 a month Club Members will receive a class featuring a stamp set or bundle. Shipping is $8.50 if needed
You can add the featured stamp set or bundle and any additional products like inks that you may need. These are offered at catalog price- a 16.5% savings to you, they will be billed separately from your subscription!
EACH CLUB BEE BOX WILL FEATURE:
- 8 card Kits (2 each of 4 different designs)
- PDF Tutorial along with videos full of tips on how to assemble your cards
- $20 to $23 of products to use on these cards with lots of extras!
- A technique, fun folds, anything goes!
Whatever we choose, it will be fun and creative and you won’t want to miss it!
Once you join, you will automatically receive the club packet each month. After six consecutive months, you will receive a special surprise gift from me as a thank you! You can cancel at any time, but we hope you will stick around!
HOW IT WORKS:
STEP 1: SUBSCRIBE!
Subscribe no later than the 25th of the month, by clicking here:

STEP 2: WATCH FOR YOUR BILLING CONFIRMATION!
You will automatically be charged your CLUB FEE to your payment on file (entered when you subscribed) on the 26th of each month – no need to worry about missing the deadline!
Once you subscribe, you are good to go, unless you want to cancel!
Note: If you subscribe on the 26th of the month, you will receive the club kit for the following month.
If you want to skip a month or cancel your subscription, you need to unsubscribe before the 25th. I can’t do credits or substitutions – so please make note of these dates!
Club kits will be ready for pick-up/ or ship-out the last week of the month.
UPCOMING MONTHLY KIT!
I will let you know what the next month’s kit will be when I ship out the current month’s kit.
DETAILS FOR THE OCTOBER BEE BOX CLUB!
This month we are featuring the Festive & Fun Stamp Set!
Subscribe no later than the 25th of the month, by clicking here:

Oct 20, 2023 | More Holiday Cards |

Dimensions:
- Basic White Thick card base – 4 1/4 x 11, scored at 5 1/2
- Basic Black Layers – 3 3/4 x 5 1/4, 2 3/4 x 4 1/2, 1 1/4 x 2 1/4
- Merry Bold & Bright Designer Series Paper – 3 1/2 x 5
- Basic White – Image – 2 1/2 x 4 1/4, Sentiment – 1 x 2

Instructions:
- Burnish the fold of the card base with a Bone Folder.
- Layer and adhere the Designer Series Paper layer to the largest Basic Black layer with Multipurpose Liquid Glue. Adhere to the card with Multipurpose Liquid Glue.
- Stamp the image and sentiment in Tuxedo Black Memento Ink onto the respective layers.
- Color the image with the following Stampin’ Blends – Daffodil Delight, Pecan Pie, Real Red, Pebbled Path, Shaded Spruce.
- Adhere to the coordinating Basic Black layer with Multipurpose Liquid Glue. Adhere to the card with Stampin’ Dimensionals.
- Fold a 4″ strip of Black & White 1/4″ Gingham Ribbon in half adhere with a Mini Glue Dot. Snip the ends at an angle with Paper Snips.
- Adhere the sentiment layer to the Basic Black layer with Multipurpose Liquid Glue and to the card with Stampin’ Dimensionals.
- Embellish with black Classic Matte Dots.

My Bee Box is now a SUBSCRIPTION CLUB – which means when you join, you can look forward to a package of crafty inspiration and goodness monthly!
THE OCTOBER SUBSCRIPTION CLUB CLOSES OCTOBER 25!
Please read the entire post for all the details on how to subscribe to the monthly kit and purchase the optional add-on products required to complete the kit. Feel free to email me with questions.
I am partnering again with my demonstrator friend, Sherry Roth to bring you an amazing club!
For $35 a month Club Members will receive a class featuring a stamp set or bundle. Shipping is $8.50 if needed
You can add the featured stamp set or bundle and any additional products like inks that you may need. These are offered at catalog price- a 16.5% savings to you, they will be billed separately from your subscription!
EACH CLUB BEE BOX WILL FEATURE:
- 8 card Kits (2 each of 4 different designs)
- PDF Tutorial along with videos full of tips on how to assemble your cards
- $20 to $23 of products to use on these cards with lots of extras!
- A technique, fun folds, anything goes!
Whatever we choose, it will be fun and creative and you won’t want to miss it!
Once you join, you will automatically receive the club packet each month. After six consecutive months, you will receive a special surprise gift from me as a thank you! You can cancel at any time, but we hope you will stick around!
HOW IT WORKS:
STEP 1: SUBSCRIBE!
Subscribe no later than the 25th of the month, by clicking here:
STEP 2: WATCH FOR YOUR BILLING CONFIRMATION!
You will automatically be charged your CLUB FEE to your payment on file (entered when you subscribed) on the 26th of each month – no need to worry about missing the deadline!
Once you subscribe, you are good to go, unless you want to cancel!
Note: If you subscribe on the 26th of the month, you will receive the club kit for the following month.
If you want to skip a month or cancel your subscription, you need to unsubscribe before the 25th. I can’t do credits or substitutions – so please make note of these dates!
Club kits will be ready for pick-up/ or ship-out the last week of the month.
UPCOMING MONTHLY KIT!
I will let you know what the next month’s kit will be when I ship out the current month’s kit.
DETAILS FOR THE OCTOBER BEE BOX CLUB!
This month we are featuring the Festive & Fun Stamp Set!
Subscribe no later than the 25th of the month, by clicking here:

Oct 4, 2023 | Gallery, More Friend Cards, More Holiday Cards |

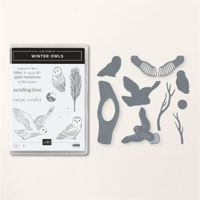
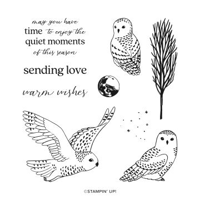
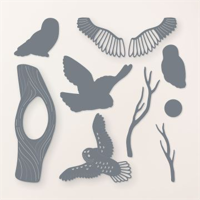
Oh how I love the WInter Owls bundle in our current Mini Catalog! I have combined the beautiful, detailed die cut owl with the One Horse Open Sleigh Designer Series Paper (you can find it in our online exclusives in my Online Store)
For the moon, I used the Deckled Circle dies and a piece of the Winter Meadow Designer Series Paper – I thought the subtle design looked like the man in the moon! The star of the show of course is the owl – complete with silver foil on her wings.
Here is the recording of my Facebook Live –
I love to add surprise touches to the inside of my cards and so added a die cut branch and one of the owls (stamped and die cut).
If you love this bundle, like I do – or are looking for peaceful, wintry, nature cards then you will want to register for my October Class to Go featuring this bundle! Details below!
REQUEST TO REGISTER BELOW!
Early Bird Special – Register by Oct 5th and receive an additional product from me!
or Registration closes October 13 at Noon ET.
Please email me with any questions!
FREE TUTORIALS- I send out Weekend Inspiration every weekend that includes a handful of Card Projects with tutorials and supply lists – and yes they are free! The first card on today’s post is one of the project tutorials! I send these out to all who are on my email list. Interested in getting these project sheets? Simply subscribe to my email list click here:

Want it all?? Have a big wish list? The BEST deal is always buying the Stampin' Up! Starter Kit! You get $125 in product of your choice for just $99 & Free Shipping! No obligation
I am blessed to lead an amazing team with members all across the United States. My team consists of both business builders and happy shoppers! The question I am most often asked about joining the SU family is – “do I have to sell?” The answer is NO! You are welcome to be a happy shopper – and a smart cookie, I might add, to get all the products you love at the demonstrator discount!
Please contact me with any questions! I’d love to have you join my “We’d Rather Bee Stampin'” team!
You will then enjoy 20% off all future purchases while you are active! What have you got to lose? The link to join is below! The best part – there is no obligation to sell, or hold parties ever!!! You can simply become a “happy shopper” and get discounts on all your Stampin’ Up! purchases! If you’d like to pursue this as a business and make a little extra money, I can help you with that as well! 

Sep 7, 2023 | Gallery, More Holiday Cards |
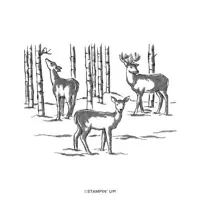
I love the simpicity of the new Graceful Deer stamp set! It just makes me feel a sense of peace. The stamp set is large – it is designed to fill the entire card front – but I used just a part of it for my card today. I inked and stamped just part of it and then die cut the part I wanted with the Nested Essentials dies. I die cut the same size die with Poppy Parade cardstock and off set them for my card.
The background paper for this card uses the One Horse Open Sleigh DSP – don’t see it in the catalog? That’s because it is an Online Exclusive – you can see them only online in my store! The snowflakes are also an Online Exclusive.
A simple, yet pretty card!
Here is the recording of my Facebook Live –
I love the sweet bird and deer!
FREE TUTORIALS- I send out Weekend Inspiration every weekend that includes a handful of Card Projects with tutorials and supply lists – and yes they are free! The first card on today’s post is one of the project tutorials! I send these out to all who are on my email list. Interested in getting these project sheets? Simply subscribe to my email list click here: