Jul 16, 2025 | Gallery, More Birthday Cards, More Friend Cards |

I had so much fun during my last Facebook Live creating these three cheerful cards using the Sweetest Jar Bundle. Each card shows just how versatile this adorable bundle is — from sending a little luck, to celebrating a birthday, to sharing a touch of sweetness!
Whether you love the playful shamrocks, the colorful shaker jar, or the charming little cookie jar, these cards are sure to make someone smile. I love how easy it is to mix and match the stamps and dies in this bundle to fit any occasion.

Want to make these cards too?
I have an Ordering Special happening now through Sunday, July 20th! When you place a $40+ order (after rewards) in my online store, you’ll receive all 3 card kits — free! It’s my way of saying thank you and giving you a head start on creating with your new goodies. Note: You will need the bundle since Stampin’ Up! policy doesn’t allow us to send stamped images in kits.
Don’t miss out on this sweet deal — shop right here!

Here’s a closer look at the cards below:
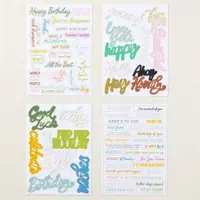
FREE TUTORIALS- I send out Weekend Inspiration every weekend that includes a handful of Card Projects with tutorials and supply lists – and yes they are free! The first card on today’s post is one of the project tutorials! I send these out to all who are on my email list. Interested in getting these project sheets? Simply subscribe to my email list click here:


Jun 18, 2025 | Gallery, More Birthday Cards, More Congrats Cards, More Love Cards |

During my recent Facebook Live over on my I’d Rather Bee Stampin’ page, I featured the absolutely gorgeous Beautiful Gallery Suite Collection from Stampin’ Up! I had so much fun creating these two cards — each with a little different look, but both showcasing the stunning elements from this suite!


The first card is bold and beautiful — I love how the richly colored florals pop against the softly embossed background. That Designer Series Paper is one of my favorites in the collection… such pretty patterns and colors! A little ribbon, some die-cut blooms, and those sweet embellishments finish it off perfectly.


The second card is softer and serene — I used the coordinating dies to create a tone-on-tone look with a pop of crisp white. The sentiment, “You’ve been on my mind,” is perfect for sending a little love to someone special. And isn’t that stitched circle die cut darling?

I’m thrilled to share that the Gallery Blooms Bundle is the star of my next Beautiful Gallery Card Class to Go! This class is packed with elegant, timeless designs that showcase the versatility of this stunning bundle — from soft florals to charming countryside scenes. You’ll receive all the pre-cut supplies you need to create six gorgeous cards, along with a step-by-step PDF tutorial to guide you through each one. Whether you’re a beginner or seasoned stamper, this class is the perfect way to add some gallery-worthy beauty to your card collection — right from the comfort of your own craft space!
Please email me with any questions!
VIEWING THIS POST BY EMAIL? To register, please EMAIL ME for a Registration Link!
FREE TUTORIALS- I send out Weekend Inspiration every weekend that includes a handful of Card Projects with tutorials and supply lists – and yes they are free! The first card on today’s post is one of the project tutorials! I send these out to all who are on my email list. Interested in getting these project sheets? Simply subscribe to my email list click here:

Apr 2, 2025 | Gallery, More Birthday Cards, More Gift Wrap Ideas |

I’m so excited to share this adorable birthday bag created with the Wildflower Birthday Suite from Stampin’ Up!—it’s the perfect way to package a sweet celebration!
Did you catch my FB Live? I also recreated the card I posted here on Monday – so cute!!! It uses many of the same products used for the bag I also made in my Live.
AND don’t miss the beginning of the Live – I do a color comparison of the upcoming new In Colors (2025-2027). The new colors are really good ones – Darling Duckling, Strawberry Slush, Timid Tiger, Secret Sea and Cloud Cover. At first glance, I always think these colors look the same as our current colors – but then I compare them and am always surprised at how different they are! Take a look and let me know what you think. Do you have a favorite?
And here’s some extra fun: Place a $50+ online order with me by this Friday, and I’ll send you a FREE surprise embellishment as a special thank-you!

FREE TUTORIALS- I send out Weekend Inspiration every weekend that includes a handful of Card Projects with tutorials and supply lists – and yes they are free! The first card on today’s post is one of the project tutorials! I send these out to all who are on my email list. Interested in getting these project sheets? Simply subscribe to my email list click here:
Sale: $8.00
Price: $10.00

Mar 28, 2025 | Gallery, More Birthday Cards |

Hello, friends! Today, I’m so excited to share this absolutely gorgeous Mixed Media Floral Easel Card with you! If you love elegant, textured designs with a pop of color, this card is sure to inspire your creativity. The combination of embossed details, delicate die cuts, and hand-colored florals creates a show-stopping effect, perfect for birthdays, celebrations, or just sending a little handmade happiness.
The bold red and black color palette adds a striking contrast, making the flowers practically leap off the card! And let’s not forget the clever easel fold – a beautiful way to display your handmade work of art. Plus, with the charming “Make a Wish” sentiment, this card is all about spreading joy!
Stay with me as I walk you through how to create this stunning card step by step. Whether you’re a seasoned crafter or just getting started, you’ll love how fun and easy it is to put together!
Ready to dive in? Let’s get started!
Card Tutorial: Make a Wish Easel Card
Measurements:
- Basic Black – 4¼” x 5 ½”
- Poppy Parade – 4 1/8”x 5 3/8”
- Basic White – 4” x 5 ¼”

Instructions:
- Cut a piece of Basic Black 4 ¼” x 5 ½”
- Cut a piece of Poppy Parade 4 1/8” x 5 3/8”
- Cut a piece of Basic White 4” x 5 ¼” and adhere to Poppy Parade
- To make the easel piece cut a piece of Basic Black 3”x 6 ¼” and score at 2 ¾” and 5 ½”. Adhere to the Basic Black piece from step 1. Adhere smallest part to the top of the base to form the easel as shown. Then adhere the piece in step 3 to this card base.
- To make the easel standing piece. Cut a piece of Poppy Parade 3”x 5 ½”.
- Cut a piece of Basic Black 2 7/8 x 5 3/8” and adhere to Poppy Parade.
- Cut a piece Basic White 2 ¾” x 5 ¼”. Then emboss with the Plaster Painting 3D Embossing Folder. Then adhere to the Piece is step 6. Adhere to easel you created as shown.
- On basic White Stamp the Flowers in Versamark and emboss with Black embossing powder. Then color with Stampin Blend markers as follows and die cut.
- Big, Small Flowers & Lady Bugs – Poppy Parade
- Flower middles – Daffodil Delight
- Leaves and Stems – Granny Apple Green
- Die cut leaves out of Basic Black. Cut them apart and adhere with glue dots to the back of the flower you created and punched out in step 8. Adhere to Basic White part of easel popped up with Dimensionals.
- Stamp lady bugs in Memento Tuxedo Black and color in with Poppy Parade Stampin Blends. Then adhere to front with Dimensionals.
- Stamp sentiment with Versamark on Basic Black and emboss with white embossing powder. Fussy cut and then adhere to card as shown with dimensionals so it is a stand for the easel.
- Cut a piece of Mixed Media Floral DSP 4” x 1 ¼” and adhere to card base as shown.


Jan 23, 2025 | Gallery, More Birthday Cards, More Friend Cards |
Yesterday on my Facebook Live I created four cards featuring the Beautiful Butterflies bundle. It’s so pretty!
If you’d like the measurements for these cards, they can be found on the FB Live recording!
The first card was made with a Fresh Freesia color palette. I also added some background details with a new stamp set called Elements of Cling – I love these kinds of stamp sets as they are a subtle way to add some interest to the layers of the card. I created the ring frame on this card by using two fo the Spotlight on Nature circle dies.
The second card is a fun layout – I cut down the front panel of the card and created a smaller flap. I used two of the Stylish Shape circle dies to agian create a frame. – I glued them together and adhered just the bottom to my card front.
I cut four of the small butterfly die cuts and adhered to on the front of the circle frame, and two on the back side – this makes the inside panel look complete.
My third card was a butterfly shaped card – just a fun card to make and send off to a friend! This bundle has become a favorite of mine and hope you will give it a try as well!
FREE TUTORIALS- I send out Weekend Inspiration every weekend that includes a handful of Card Projects with tutorials and supply lists – and yes they are free! The first card on today’s post is one of the project tutorials! I send these out to all who are on my email list. Interested in getting these project sheets? Simply subscribe to my email list click here:

Nov 21, 2024 | Gallery, More Bee Creative Tutorials, More Birthday Cards |

The Regal Winter Designer Series Paper in the 2024 Holiday Catalog is gorgeous and I especially love this Wild Wheat colored design. I used the following mix of products to create this quick card (full list of products is at the end of this blog post):
- Regal Winter Designer Series Paper – Item 164156
- Autumn Expressions Stamp Set – Item 164174
- Stylish Shapes Dies – Item 159183
- Gold Textured Adhesive-Backed Dots – 164027


MEASUREMENTS:
- Early Espresso Cardstock: 4 1/4 x 11 – score at 5 1/2 (card base), 3 1/2 x 4 3/4 (layer), 2 1/2 circle, 2 3/4 x 1/2 flagged pieces
- Regal Winter Designer Series Paper: 3 3/4 x 5
- Wild Wheat Cardstock: 3 3/4 x 5
INSTRUCTIONS:
- Fold the Early Espresso Cardstock in half and burnish the fold with a Bone Folder.
- Use Multipurpose Glue to attach the Designer Series Paper and Early Espresso to the Wild Wheat layer.
- Adhere the panel to the card base with dimensionals.
- Stamp the sentiment in Versamark Ink onto the Shaded Spruce layer. Heat emboss with white WOW! Embossing Powder.
- Crop the sentiment with the 2 1/2 Stylish Shapes circle die. Adhere with Stampin’ Dimensionals.
- Crop the Early Espresso piece with the Happy Little Things flagged banner die. Snip with Paper Snips, leaving one side a touch longer than the other. Adhere as shown.
- Finish the card by embellishing with Gold Textured Adhesive-Backed Dots and a bow of Linen Thread secured with a Mini Glue Dot.