Nov 8, 2021 | More Bee Creative Tutorials, More Christmas Cards |

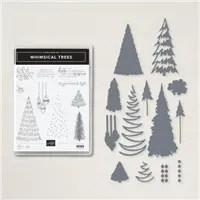
I’ll be sharing some projects featuring the Whimsical Trees Bundle this week. I think my favorite part of this suite is the set of dies – featuring trees in different shapes and sizes. I love the dies on today’s card – the tall skinny trees – pack a punch with the added detail.

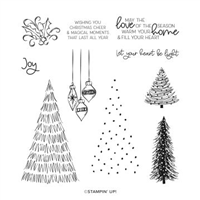
WHIMSICAL TREES STAMP SET
Enjoy a festival of trees with the Whimsical Trees Stamp Set. Choose your favorite tree from this charming assortment or build a fun festive forest. Add the ornaments plus a greeting and your Christmas card will be complete. You can also use them to make gift tags and other holiday projects.
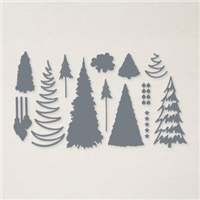
CHRISTMAS TREES DIES
It’s trees, trees, and more trees in the amazing Christmas Trees Dies. Use these dies to cut out stamped images, create a wondrous woodsy scene, and more. While the trees are perfect for Christmastime creations, they can easily be used year-round. No one will care if you can see the forest for the trees when the trees are this glorious.


MEASUREMENTS:
- Basic White Thick Cardstock- 4 1/4 x 11 score at 5 1/2 (card base)
- Basic White Cardstock- 3 1/4 x 4 1/2 (layer)
- Whimsy & Wonder 12×12 Specialty DSP – 3 5/8 x 4 7/8 (layer), 3 x 1/4 (layer)
- Soft Sea Foam Cardstock – 2 1/2 x 1/2 (sentiment layer)

INSTRUCTIONS:
- Fold the Basic White Thick Cardstock in half and burnish the fold with a Bone Folder.
- Adhere the Whimsy & Wonder Specialty Designer Series Paper to the card base with Stampin’ Dimensionals.
- Use a Blending Brush to add a touch of Soft Sea Foam Classic Ink to the center of the Basic White layer. Adhere to the card with Multipurpose Liquid Glue.
- Use the Christmas Trees Dies and a Stampin’ Cut & Emboss Machine (Mini or Standard) to crop two trees in Whisper White and one tree in Silver Foil. Adhere as shown with Mini Stampin’ Dimensionals.
- Tie a bow of Silver Simply Elegant Trim and adhere as shown with Mini Glue Dot.
- Stamp the sentiment in Versamark Ink onto the Soft Sea Foam Cardstock. Emboss with Silver Metallics Embossing Powder. Adhere to the strip of Designer Series Paper with Multipurpose Liquid Glue. Adhere to the card with Stampin’ Dimensionals.
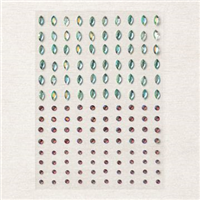
- Embellish with Rhinestone Basic Jewels.

Want it all?? Have a big wish list? The BEST deal is always buying the Stampin' Up! Starter Kit! You get $125 in product of your choice for just $99 & Free Shipping! No obligation
I am blessed to lead an amazing team with members all across the United States. My team consists of both business builders and happy shoppers! The question I am most often asked about joining the SU family is – “do I have to sell?” The answer is NO! You are welcome to be a happy shopper – and a smart cookie, I might add, to get all the products you love at the demonstrator discount!
Please contact me with any questions! I’d love to have you join my “We’d Rather Bee Stampin'” team!
You will then enjoy 20% off all future purchases while you are active! What have you got to lose? The link to join is below! The best part – there is no obligation to sell, or hold parties ever!!! You can simply become a “happy shopper” and get discounts on all your Stampin’ Up! purchases! If you’d like to pursue this as a business and make a little extra money, I can help you with that as well! 


Nov 5, 2021 | Gallery, More Bee Creative Tutorials, More Christmas Cards, More Gift Wrap Ideas |

For my Facebook Live Take 2 I shared two more projects featuring the beautiful Eden’s Garden Collection of products!

You can click below to watch how both go together.

It was really fun to create this fancy bow for my box – and it’s actually fun and easy to do! I used 2 strips of the Evening Evergreen Cotton Paper – both strips measuring 4 x 12 inches. You can see the step by step way to create this in the recording above.

I received a lot of nice comments about the tag I had made and shared on Monday’s Facebook Live and thought it would be fun to create a card using the same idea -and so I did just that . I used the Merry Melody 3D Embossing Folder for the background panel of Evening Evergreen cardstock. I was a Music Major in college (proud Alum of the University of Michigan!) and so I was curious whether this embossing folder was actually a song, or just a made of score to look like a real song – so I took the Embossing Folder to my piano – and played the notes – and realized that the folder is actually the script for Joy to the World! So cool!!!! So now whenever I use this folder, I will think of one of my favorite hymns – and hope you do as well!
By adding some Cherry Cobbler cardstock into the Eden’s Garden colors of Soft Succulent and Evening Evergreen, I created a Christmas card – bringing more versatility to this collection! the Designer Paper is cut at 1 x 3 inches.

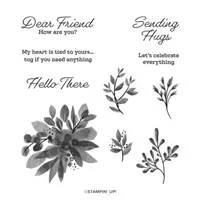
My circle is cropped from the smallest circle of the Layering Circle dies, and stamped with Evening Evergreen ink. Greeting is from the Tidings and Trimmings stamp set from our Annual Catalog.

Hope you all enjoy your weekend! Thanks for stopping by today!
Want it all?? Have a big wish list? The BEST deal is always buying the Stampin' Up! Starter Kit! You get $125 in product of your choice for just $99 & Free Shipping! No obligation
I am blessed to lead an amazing team with members all across the United States. My team consists of both business builders and happy shoppers! The question I am most often asked about joining the SU family is – “do I have to sell?” The answer is NO! You are welcome to be a happy shopper – and a smart cookie, I might add, to get all the products you love at the demonstrator discount!
Please contact me with any questions! I’d love to have you join my “We’d Rather Bee Stampin'” team!
You will then enjoy 20% off all future purchases while you are active! What have you got to lose? The link to join is below! The best part – there is no obligation to sell, or hold parties ever!!! You can simply become a “happy shopper” and get discounts on all your Stampin’ Up! purchases! If you’d like to pursue this as a business and make a little extra money, I can help you with that as well!

Nov 2, 2021 | Gallery, More Bee Creative Tutorials |

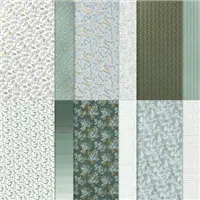
Today is the official release of the Eden’s Garden Collection – a gorgeous set of products including the Eden’s Garden stamp set and dies- bundled together, the gorgeous Ever Eden Specialty Designer Series Paper, Ever Eden Cotton Paper and Garden Gems. The bundle will be featured in our upcoming January – June Mini Catalog. The other products – the Designer Paper, Cotton Paper and Gems are only part of the Early Release and are available only while supplies last.
For my Facebook Live on Monday, I created a card and a tag featuring these products!
You can click below to watch how both go together.

I used the gorgeous Ever Eden Designer Series Paper for my card – its a specialty paper with touches of gold. I used one of the dies to create the panel for the words, and added the greeting in Evening Evergreen ink.

I added a panel of Gold Shimmer Vellum and like that you can see a bit of the Designer Paper underneath.

My tag shows a different take on this Collection of products – it makes a beautiful Christmas tag!

I used the Tailored Tags for the base of the tag – these are a must have – I can’t tell you how many times I have used my set of these dies! I then added different strips of the Designer Series Paper and layered them onto the tag – offsetting a bit. The Cherry Cobbler sprigs were cropped with the Eden dies and I love the pop of color they bring to this tag. I finished the tag by stamping a Christmas greeting from the Tidings and Trimmings stamp set onto a cropped circle from the Layering Circle dies.

The beautiful Garden Gems and a touch of sparkle to this tag.
Measurements Card:
Card – Thick Basic White Base: 5 1/2 x 8 1/2, scored at 4 1/4
DSP: 4 1/4 x 5 1/2, 3 x 4 1/4
Gold Shimmer Vellum: 3 x 2 1/4
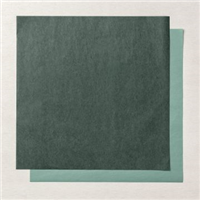
Strip of Cotton Paper – Evening Evergreen
Measurements Tag–
Evening Evergreen cropped with Tailored Tag Die
DSP: 1 x 2 – cut 3; 1 x 1/2
Cherry Cobbler – small piece for sprigs
Crumb Cake – Layering Circle Dies
Want it all?? Have a big wish list? The BEST deal is always buying the Stampin' Up! Starter Kit! You get $125 in product of your choice for just $99 & Free Shipping! No obligation
I am blessed to lead an amazing team with members all across the United States. My team consists of both business builders and happy shoppers! The question I am most often asked about joining the SU family is – “do I have to sell?” The answer is NO! You are welcome to be a happy shopper – and a smart cookie, I might add, to get all the products you love at the demonstrator discount!
Please contact me with any questions! I’d love to have you join my “We’d Rather Bee Stampin'” team!
You will then enjoy 20% off all future purchases while you are active! What have you got to lose? The link to join is below! The best part – there is no obligation to sell, or hold parties ever!!! You can simply become a “happy shopper” and get discounts on all your Stampin’ Up! purchases! If you’d like to pursue this as a business and make a little extra money, I can help you with that as well!

Nov 1, 2021 | Gallery, More Bee Creative Tutorials, More Christmas Cards |

I’m showcasing the beautiful Eden’s Garden Collection this week! It’s an early release of a bundle that will appear in our upcoming January – June Mini Catalog. Some of the products in this early release are only while supplies last and won’t be featured in the Mini Catalog.
Thanks to everyone who left a comment last week for my “week of tricks and treats!” I enjoyed hearing from you and learning about your favorite candy and Halloween traditions! If you were one of the daily winners, I will be sending out your prizes tomorrow!

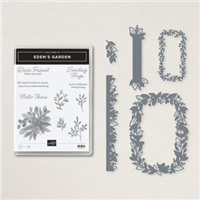
EDEN’S GARDEN COLLECTION • 160849 | $82.00 – Available November 2, 2021
• Stems, sprigs, berries, and twigs abound in the beautiful and bountiful Eden’s Garden Collection! Explore the elegance of Eden with this exclusive, early-release collection. Only available while supplies last.
The Eden’s Garden Collection includes:
• Eden’s Garden Bundle (10% off)
• Ever Eden 12″ x 12″ Specialty Designer Series Paper
• Ever Eden 12″ x 12″ Cotton Paper
• Garden Gems
I love slimline cards and this one really shows off the beautiful Eden’s Garden Collection! The Designer Paper is gorgeous – it’s a specialty paper with gold – that and the combination of Evening Evergreen and Soft Succulent colors make it very striking! Please click below for a tutorial for this card! Enjoy!!

MEASUREMENTS:
- Evening Evergreen- 8 1/2 x 8 (card base), score at 4
- Vellum Cardstock – 8 3/8 x 3 (layer)
- Ever Eden 12×12 Specialy DSP – 8 1/4 x 2 (layer), 3 x 3, 2 x 2 (die-cutting)
- Gold Foil Sheet – 4 1/2 x 2 1/2 (die-cutting)

INSTRUCTIONS:
- Fold the Evening Evergreen Cardstock in half and burnish the fold with a Bone Folder.
- Adhere the Ever Eden Specialty Designer Series Paper to the Vellum Cardstock together with Multipurpose Liquid Glue.
- Double wrap with Gold Simply Elegant Trim. Secure with a bow.
- Adhere to the card with Stampin’ Dimensionals.
- Crop the Gold Foil a Stampin’ Cut & Emboss Machine and the Eden Dies. Adhere with Dimensionals.
- Crop the Ever Eden Specialty Designer Series Paper with the 3″ scalloped and 2 3/8″ Layering Circle Dies.
- Stamp the sentiment in Versamark Ink onto the 2 3/8″ die-cut circle. Cover with Gold Metallic Embossing Powder. Set with a Heat Tool.
- Adhere the two die-cut circles together with Multipurpose Liquid Glue. Adhere the Gold Foil die-cut with Mini Glue Dots.
- Adhere to the card with Stampin’ Dimensionals.
- Embellish with Gilded Gems.
Registration is open from now to November 5 for my Eden’s Garden Card Class to Go!

Want it all?? Have a big wish list? The BEST deal is always buying the Stampin' Up! Starter Kit! You get $125 in product of your choice for just $99 & Free Shipping! No obligation
I am blessed to lead an amazing team with members all across the United States. My team consists of both business builders and happy shoppers! The question I am most often asked about joining the SU family is – “do I have to sell?” The answer is NO! You are welcome to be a happy shopper – and a smart cookie, I might add, to get all the products you love at the demonstrator discount!
Please contact me with any questions! I’d love to have you join my “We’d Rather Bee Stampin'” team!
You will then enjoy 20% off all future purchases while you are active! What have you got to lose? The link to join is below! The best part – there is no obligation to sell, or hold parties ever!!! You can simply become a “happy shopper” and get discounts on all your Stampin’ Up! purchases! If you’d like to pursue this as a business and make a little extra money, I can help you with that as well!

Oct 29, 2021 | Gallery, More Bee Creative Tutorials |

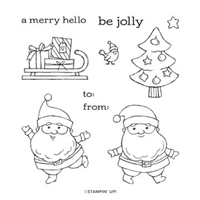
In my Facebook Live on Thursday of this week, I created a darling Santa Framed Art featuring the Be Jolly Stamp Set! This is a tiny frame – just 3 inches square – and is perfect for sitting on a desk, windowsill or a collection of Christmas items to create a vignette! And again, I wanted to show that Santa doesn’t always need to be in a red suit! This Jolly Santa for today is sporting a special coat of our Snowy White Velvet Sheets! Wish you could touch it – it’s like real velvet – so soft and pretty!
You can click below to watch how this goes together! It’s actually pretty easy – you will need your Paper Snips – for just a bit of fussy cutting!

I stamped the Santa stamp on the Snowy White Velvet Sheet with Early Espresso ink – then set it aside for a minute or two to give the ink a chance to set. While I was waiting for that to dry, I stamped another Santa with Early Espresso ink – this time onto a piece of Basic White cardstock. I added some color to his face and beard with Stampin’ Blends – Petal Pink – Light and Dark, Smoky Slate – Light. I also used my Color Lifter to soften the color I added to Santa’s beard a bit.
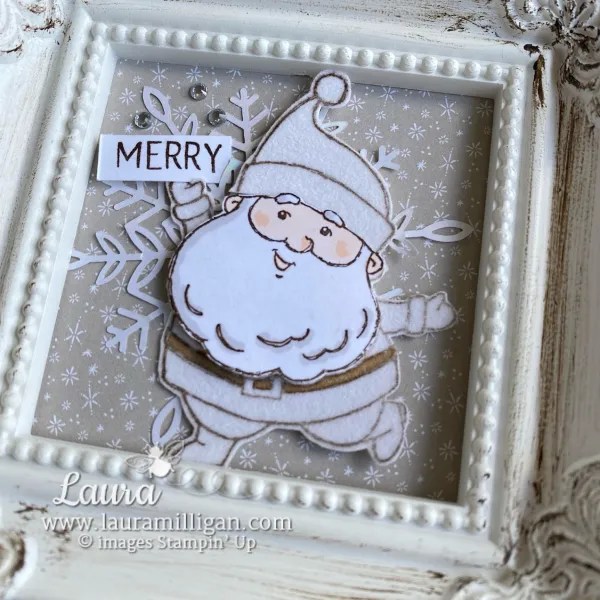
I then took the stamped Velvet piece and added some color to Santa’s belt with a Light Crumb Cake Blend. Then the Fussy Cutting began – I started by cutting out the Velvet Santa – I cut his suit and face as one piece, and then his hat – cutting around his eyebrows. Next I cut his face and beard from the Basic White Cardstock panel. You can “see” how I did this in the video above!

Isn’t he just the cutest? I love this jolly little guy!


A week of Tricks & Treats Giveaway! Comment at the end of this post the answer to this question “If you could only wear one Halloween costume for the rest of your life, what would you be?” for your chance to win the Bolt of Frayed Grosgrain Ribbon. A random winner will be drawn and posted on my blog tomorrow!

Want it all?? Have a big wish list? The BEST deal is always buying the Stampin' Up! Starter Kit! You get $125 in product of your choice for just $99 & Free Shipping! No obligation
I am blessed to lead an amazing team with members all across the United States. My team consists of both business builders and happy shoppers! The question I am most often asked about joining the SU family is – “do I have to sell?” The answer is NO! You are welcome to be a happy shopper – and a smart cookie, I might add, to get all the products you love at the demonstrator discount!
Please contact me with any questions! I’d love to have you join my “We’d Rather Bee Stampin'” team!
You will then enjoy 20% off all future purchases while you are active! What have you got to lose? The link to join is below! The best part – there is no obligation to sell, or hold parties ever!!! You can simply become a “happy shopper” and get discounts on all your Stampin’ Up! purchases! If you’d like to pursue this as a business and make a little extra money, I can help you with that as well!

Oct 28, 2021 | Gallery, More Bee Creative Tutorials |

Today my “treat” for the day is a wonderful stamp set – Daisy Garden! I love this set and I know many friends who would pick daisies as their favorite flower!

I’m sharing this card from a previous blog post – just to give you a way to use the stamp set! Black and Daffodil Delight is such a great, happy color combination. You can get the tutorial for this card by clicking below!


A week of Tricks & Treats Giveaway! Comment at the end of this post the answer to this question “will you be carving a pumpkin this year and do you roast the seeds?” for your chance to win the Daisy Garden Stamp Set! Let me know – and a random winner will be drawn and posted on my blog tomorrow!
Want it all?? Have a big wish list? The BEST deal is always buying the Stampin' Up! Starter Kit! You get $125 in product of your choice for just $99 & Free Shipping! No obligation
I am blessed to lead an amazing team with members all across the United States. My team consists of both business builders and happy shoppers! The question I am most often asked about joining the SU family is – “do I have to sell?” The answer is NO! You are welcome to be a happy shopper – and a smart cookie, I might add, to get all the products you love at the demonstrator discount!
Please contact me with any questions! I’d love to have you join my “We’d Rather Bee Stampin'” team!
You will then enjoy 20% off all future purchases while you are active! What have you got to lose? The link to join is below! The best part – there is no obligation to sell, or hold parties ever!!! You can simply become a “happy shopper” and get discounts on all your Stampin’ Up! purchases! If you’d like to pursue this as a business and make a little extra money, I can help you with that as well!