Dec 8, 2021 | Gallery, More Christmas Cards, More Gift Wrap Ideas, More Video Tutorials |

Monday I did a Facebook Live on my I’d Rather Bee Stampin’ page. This framed art, coordinating card and was created using the Christmas Tree Dies from the 2021 Holiday Catalog.
You can see how I created the framed art and two cards by watching my Facebook Live video below.

MEASUREMENTS:
- Night of Navy – 8 ½ x 5 ½
- Basic White: 4“ square; 4 x 5 ¼ inside panel, 3/8 x 4 ¼ words
- Peaceful Place DSP: 3 x 1 /2

Want it all?? Have a big wish list? The BEST deal is always buying the Stampin' Up! Starter Kit! You get $125 in product of your choice for just $99 & Free Shipping! No obligation
I am blessed to lead an amazing team with members all across the United States. My team consists of both business builders and happy shoppers! The question I am most often asked about joining the SU family is – “do I have to sell?” The answer is NO! You are welcome to be a happy shopper – and a smart cookie, I might add, to get all the products you love at the demonstrator discount!
Please contact me with any questions! I’d love to have you join my “We’d Rather Bee Stampin'” team!
You will then enjoy 20% off all future purchases while you are active! What have you got to lose? The link to join is below! The best part – there is no obligation to sell, or hold parties ever!!! You can simply become a “happy shopper” and get discounts on all your Stampin’ Up! purchases! If you’d like to pursue this as a business and make a little extra money, I can help you with that as well! 


Dec 3, 2021 | Gallery, More Christmas Cards, More Gift Wrap Ideas, More Video Tutorials |

Yesterday I did a Facebook Live on my I’d Rather Bee Stampin’ page. This gift card holder was inspired by the talented Carol Payne. Thank you, Carol for the inspiration!
You can see how I created this gift card holder by watching my Facebook Live video below.

MEASUREMENTS:
- Shaded spruce – 4 ¼ x 5 ½; 2 ¾ x 8 ½ – scored at 2 ½ and 6 ¾ ; small piece for punching 2 holly leaves
- Basic White: 3 ¾ x 5; 2 x 2 ¼; 2 ½ x 4, piece for stamping Santa
- Real Red: 5 ¼” x 4”, 2 ¼” x 2 ½” 1 x 1 ½
- Smoky Slate: ¾ x 5, 1 5/8 x ¼

Want it all?? Have a big wish list? The BEST deal is always buying the Stampin' Up! Starter Kit! You get $125 in product of your choice for just $99 & Free Shipping! No obligation
I am blessed to lead an amazing team with members all across the United States. My team consists of both business builders and happy shoppers! The question I am most often asked about joining the SU family is – “do I have to sell?” The answer is NO! You are welcome to be a happy shopper – and a smart cookie, I might add, to get all the products you love at the demonstrator discount!
Please contact me with any questions! I’d love to have you join my “We’d Rather Bee Stampin'” team!
You will then enjoy 20% off all future purchases while you are active! What have you got to lose? The link to join is below! The best part – there is no obligation to sell, or hold parties ever!!! You can simply become a “happy shopper” and get discounts on all your Stampin’ Up! purchases! If you’d like to pursue this as a business and make a little extra money, I can help you with that as well!

Nov 29, 2021 | Gallery, More Bee Creative Tutorials, More Christmas Cards |

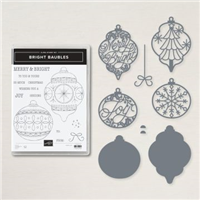
A glittery Merry & Bright Christmas Card is another showcase of the Bright Baubles Bundle from the soon-to-be-retired 2021 Holiday Mini Catalog from Stampin’ Up!

BRIGHT BAUBLES CLING STAMP SET
Stamp bright and beautiful Christmas baubles with the Bright Baubles Stamp Set. The delicate line images are bold enough to be used on their own, stamped in just ink, or heat embossed. Or you can color them using your favorite coloring tools and techniques. The ornament images are large enough to make tags for gifts or treats for neighbors and friends. You can also stamp them on your annual Christmas cards. The greetings are designed so you can mix and match and customize the sentiments for all your Christmas projects.
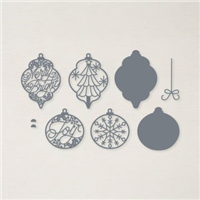
DELICATE BAUBLES DIES
Create opulent ornaments for cards or tags with the Delicate Baubles Dies. The dies cut out full ornament shapes and delicate overlays to create more detailed ornaments. Dies are sized perfectly for large tags for gift and treat packages. The die set includes a ribbon piece to create the illusion of hanging ornaments. Mix and match ornaments and overlays for a variety of looks, or use Paper Snips Scissors to cut apart the images to create unique elements.


MEASUREMENTS:
- Basic Black Cardstock- 4 1/4 x 11 score at 5 1/2 (card base)
- Basic White Cardstock – 4 x 5 1/4 (Qty 2) (layers), 1 5/8 x 3/8 (sentiment)
- Black Glitter Paper – 3 3/4 x 5 (layer), 3 x 4 (die-cutting)
- Gold Metallic Specialty Paper – 3 1/4 x 4 1/4 (die-cutting)

INSTRUCTIONS:
- Fold the Basic Black Cardstock in half and burnish the fold with a Bone Folder.
- Stamp the interior sentiments in Versamark Ink onto one of the Basic White Layers. Cover with Gold Metallic Stampin’ Emboss Powder. Set with a Heat Tool. Adhere to the inside with Multipurpose Liquid Glue.
- Adhere the 2nd Basic White Layer to the outside with Multipurpose Liquid Glue.
- Adhere the Black Glitter Paper layer with Stampin’ Dimensionals.
- Use the Delicate Baubles Dies and a Stampin’ Cut & Emboss Machine (Mini or Standard) to crop the detailed bauble and in Black Glitter Paper and solid bauble in Gold Metallic Specialty Paper. Adhere together with Multipurpose Liquid Glue.
- Punch a hole in the top of the bauble with a handheld circle punch. Thread Gold Shimmer Ribbon through, adhering to the backside with Mini Glue Dots. Tie a bow of ribbon and adhere to the top with a Mini Glue Dot. Adhere the bauble to the card with Stampin’ Dimensionals.
- Stamp the sentiments in Versamark Ink onto the Basic White Cardstock. Emboss with Gold Metallics Embossing Powder. Adhere to the card with Stampin’ Dimensionals.
- Embellish with Gold Brushed Metallic Adhesive Backed Dots.

Want it all?? Have a big wish list? The BEST deal is always buying the Stampin' Up! Starter Kit! You get $125 in product of your choice for just $99 & Free Shipping! No obligation
I am blessed to lead an amazing team with members all across the United States. My team consists of both business builders and happy shoppers! The question I am most often asked about joining the SU family is – “do I have to sell?” The answer is NO! You are welcome to be a happy shopper – and a smart cookie, I might add, to get all the products you love at the demonstrator discount!
Please contact me with any questions! I’d love to have you join my “We’d Rather Bee Stampin'” team!
You will then enjoy 20% off all future purchases while you are active! What have you got to lose? The link to join is below! The best part – there is no obligation to sell, or hold parties ever!!! You can simply become a “happy shopper” and get discounts on all your Stampin’ Up! purchases! If you’d like to pursue this as a business and make a little extra money, I can help you with that as well!

Nov 23, 2021 | Gallery, More Bee Creative Tutorials, More Christmas Cards, More Gift Wrap Ideas |

I created one gift card on my Facebook Live yesterday – but am sharing two today. They both feature the Bright Baubles bundle – and are gift card holders! I know I sure use a lot of gift card holders this time of year and hopefully this will give you an idea for a quick and easy gift card holder – and they fit in a regular size envelope, so they can be mailed!
Both cards feature the retired Be Dazzling Specialty Paper – I have some extra packets and am offering an ordering incentive for this week – while my supply lasts! We all loved this paper – and it sold out during Saleabration – but I have some extras to share!

You can click below to watch how to assemble the gift card holders!

On my Night of Navy card, I used the “new to me” Star Crossed embossing folder – it’s so cool! I had overlooked it in our Mini Catalog but am glad that I discovered it recently! It embosses both a checkered pattern and a star pattern. Love it!
Quick Measurement for the Gift Card base is 4 1/4 x 11, scored at 5 1/2 and 9.
Want it all?? Have a big wish list? The BEST deal is always buying the Stampin' Up! Starter Kit! You get $125 in product of your choice for just $99 & Free Shipping! No obligation
I am blessed to lead an amazing team with members all across the United States. My team consists of both business builders and happy shoppers! The question I am most often asked about joining the SU family is – “do I have to sell?” The answer is NO! You are welcome to be a happy shopper – and a smart cookie, I might add, to get all the products you love at the demonstrator discount!
Please contact me with any questions! I’d love to have you join my “We’d Rather Bee Stampin'” team!
You will then enjoy 20% off all future purchases while you are active! What have you got to lose? The link to join is below! The best part – there is no obligation to sell, or hold parties ever!!! You can simply become a “happy shopper” and get discounts on all your Stampin’ Up! purchases! If you’d like to pursue this as a business and make a little extra money, I can help you with that as well!

Nov 22, 2021 | More Bee Creative Tutorials, More Christmas Cards |

I’ll be sharing some projects featuring the Bright Baubles Bundle this week.
BRIGHT BAUBLES CLING STAMP SET
Stamp bright and beautiful Christmas baubles with the Bright Baubles Stamp Set. The delicate line images are bold enough to be used on their own, stamped in just ink, or heat embossed. Or you can color them using your favorite coloring tools and techniques. The ornament images are large enough to make tags for gifts or treats for neighbors and friends. You can also stamp them on your annual Christmas cards. The greetings are designed so you can mix and match and customize the sentiments for all your Christmas projects.
DELICATE BAUBLES DIES
Create opulent ornaments for cards or tags with the Delicate Baubles Dies. The dies cut out full ornament shapes and delicate overlays to create more detailed ornaments. Dies are sized perfectly for large tags for gift and treat packages. The die set includes a ribbon piece to create the illusion of hanging ornaments. Mix and match ornaments and overlays for a variety of looks, or use Paper Snips Scissors to cut apart the images to create unique elements.

MEASUREMENTS:
- Basic White Thick Cardstock- 4 1/4 x 11 score at 5 1/2 (card base)
- Basic White Cardstock – 3 1/4 x 4 1/2 (layer), 3 1/4 Squares x 4 (die-cutting)
- Misty Moonlight Cardstock – 3 1/4 x 4 1/2 (layer), scrap for sentiments
INSTRUCTIONS:
- Fold the Basic White Thick Cardstock in half and burnish the fold with a Bone Folder.
- Adhere the Basic White and Misty Moonlight layers together and to the card base with Stampin’ Dimensionals.
- Use the Delicate Baubles Dies and a Stampin’ Cut & Emboss Machine (Mini or Standard) to crop three detailed snowflake baubles and one solid bauble in Basic White.
- Use a Blending Brush to add a touch of Misty Moonlight Classic Ink to the center of one of the Basic White die-cuts. Adhere all pieces together with Multipurpose Liquid Glue.
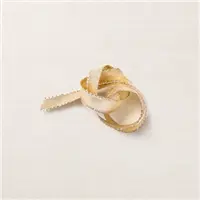
- Thread a piece of Misty Moonlight/Silver Baker’s Twine through the top, securing with a knot.
- Stamp the sentiments in Versamark Ink onto the Misty Moonlight Cardstock. Emboss with White Basics Embossing Powder. Trim to size. Adhere to the card with Stampin’ Dimensionals.
- Embellish with Blue Ådhesive-Backed Gems.
Want it all?? Have a big wish list? The BEST deal is always buying the Stampin' Up! Starter Kit! You get $125 in product of your choice for just $99 & Free Shipping! No obligation
I am blessed to lead an amazing team with members all across the United States. My team consists of both business builders and happy shoppers! The question I am most often asked about joining the SU family is – “do I have to sell?” The answer is NO! You are welcome to be a happy shopper – and a smart cookie, I might add, to get all the products you love at the demonstrator discount!
Please contact me with any questions! I’d love to have you join my “We’d Rather Bee Stampin'” team!
You will then enjoy 20% off all future purchases while you are active! What have you got to lose? The link to join is below! The best part – there is no obligation to sell, or hold parties ever!!! You can simply become a “happy shopper” and get discounts on all your Stampin’ Up! purchases! If you’d like to pursue this as a business and make a little extra money, I can help you with that as well!

Nov 12, 2021 | Gallery, More Bee Creative Tutorials, More Christmas Cards |


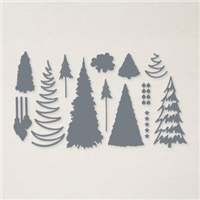
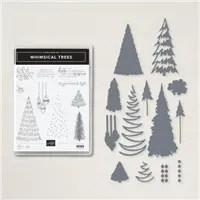
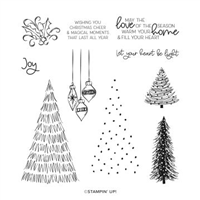
WHIMSICAL TREES STAMP SET
Enjoy a festival of trees with the Whimsical Trees Stamp Set. Choose your favorite tree from this charming assortment or build a fun festive forest. Add the ornaments plus a greeting and your Christmas card will be complete. You can also use them to make gift tags and other holiday projects.
CHRISTMAS TREES DIES
It’s trees, trees, and more trees in the amazing Christmas Trees Dies. Use these dies to cut out stamped images, create a wondrous woodsy scene, and more. While the trees are perfect for Christmastime creations, they can easily be used year-round. No one will care if you can see the forest for the trees when the trees are this glorious.

MEASUREMENTS:
- Basic White Thick Cardstock- 5 1/2 x 8 1/2 – score at 4 1/4 (card base)
- Basic White- 4 x 5 ¼, 7/8 x 2 1/2
- Whimsy and Wonder Specialty Designer Series Paper: 4 ¾ x 2 ¼; 4 ¾ x 1 1/8
- Scraps of white for die cutting trees
- White Baker’s Twine
INSTRUCTIONS:
- Fold the Basic White Thick Cardstock in half and burnish the fold with a Bone Folder.
- Crop the trees with Basic White Cardstock and the Cut & Emboss Machine (or the Mini Cut & Emboss Machine)
- Use Multipurpose Glue to attach the two trees to the Mint Macaron Designer Series Paper Panel.
- Wrap a piece of White Baker’s Twine around tree panel, tie a bow, and position onto the 4 x 5 1/4 Basic White panel with dimensionals.
- Adhere the large panel of Designer Series Paper beside the popped up panel on card front with Multipurpose Liquid Glue.
- Use Mint Macaron Ink to stamp greeting onto small Basic White Panel. Flag the end with Paper Snips.
- Use Dimensionals to adhere the word panel.
- Use Multipurpose Liquid Glue to attach the 4 x 5 1/4 panel to card base.
- Finish the card by embellishing with Basic Rhinestone Basic Jewels.
Want it all?? Have a big wish list? The BEST deal is always buying the Stampin' Up! Starter Kit! You get $125 in product of your choice for just $99 & Free Shipping! No obligation
I am blessed to lead an amazing team with members all across the United States. My team consists of both business builders and happy shoppers! The question I am most often asked about joining the SU family is – “do I have to sell?” The answer is NO! You are welcome to be a happy shopper – and a smart cookie, I might add, to get all the products you love at the demonstrator discount!
Please contact me with any questions! I’d love to have you join my “We’d Rather Bee Stampin'” team!
You will then enjoy 20% off all future purchases while you are active! What have you got to lose? The link to join is below! The best part – there is no obligation to sell, or hold parties ever!!! You can simply become a “happy shopper” and get discounts on all your Stampin’ Up! purchases! If you’d like to pursue this as a business and make a little extra money, I can help you with that as well!