Nov 14, 2024 | Gallery, More Bee Creative Tutorials, More Christmas Cards |

This simple Christmas Card with an adorable paper bow is quick and easy to make by using the following three key Stampin’ Up! products:
- Sentimental Christmas Designer Series Paper – Item 164209
- Peaceful Evergreen Dies – Item 164024
- Decorative Trees Stamp Set – Item 164275


MEASUREMENTS:
- Basic Beige Cardstock: 5 1/2 x 8 1/2 – score at 4 1/4 (card base), 3 3/4 x 5 (layer)
- Sentimental Christmas Designer Series Paper: 2 1/4 x 4 3/4 and 1 1/8 x 4 3/4
- Shaded Spruce Cardstock: 3 3/4 x 3/8 (sentiment) and scraps for die-cut bow

INSTRUCTIONS:
- Fold the Basic Beige Cardstock in half and burnish the fold with a Bone Folder.
- Use Multipurpose Glue to attach the two Designer Series Paper Panels to the Basic Beige layer.
- Adhere the Basic Beige panel to the card base with dimensionals.
- Stamp the sentiment in Versamark Ink onto the Shaded Spruce layer. Heat emboss with white WOW! Embossing Powder.
- Adhere the sentiment panel with Multipurpose Liquid Glue.
- Crop the four Shaded Spruce bow pieces with a Stampin’ Cut & Emboss Machine (Standard or Mini) and the Peaceful Evergreen Dies.
- Adhere all the bow pieces together with Mini Glue Dots. TIP: Wrap the bow pieces around a smooth pen or pencil while assembling to prevent it from creasing (I didn’t on the one that is creased).
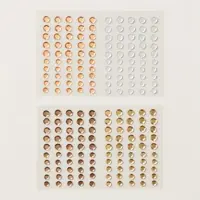
- Finish the card by embellishing with Shaded Spruce Regal Foiled Adhesive-Backed Dots.


Nov 12, 2024 | Fall Cards, Gallery, More Birthday Cards, More Christmas Cards |
If these cards don’t get you in the mood for Christmas I’m not sure anything will!! These cards all feature the Take a Bow DSP – it’s so cute! And perfect for Christmas cards/projects – but also some of the patterns can we used for other times, too!! These are the three cards I made yesterday on my weekly FB Live.

Below is the video recording of my live:

The first card used the second smallest circle die from the Stylish Shapes dies. The nice thing about cutting DSP with the dies is that you can do several at the same time – a great time saver! When I created this card, I asked my viewers to pick whether they liked the Santa in the center of the card – or if they preferred the house?? Which do you like best?
I
I die cut a few more circles and cut them in half with my Paper Trimmer and added them along the Basic White panel on the inside of the card! Great way to use small DSP scraps – we all have them, don’t we?


My second card featured more of the Take a Bow DSP – I used the Greetings of the Seasons dies to create the two large tags. Both the Santa and the House are from punch bundles – which means you can punch them quickly! I also used the Red & White Peppermint Gems for my embellishments on all of the cards – they are just too cute! Thanks for stopping by – I hope you like my cards!


Two Classes-to-Go & a Bonus When You Register for Both!!
Humble Home Card Class-to-Go ($35) &
Sweetest Star Bee-utiful Gift Card Holder Class-to-Go! ($40)
Register for both and get a FREE Wink of Stella Glitter Brush! – a $9 Value
Details for each class listed within registration!
Registration Open: NOW – November 13!
Please email me with any questions!
FREE TUTORIALS- I send out Weekend Inspiration every weekend that includes a handful of Card Projects with tutorials and supply lists – and yes they are free! The first card on today’s post is one of the project tutorials! I send these out to all who are on my email list. Interested in getting these project sheets? Simply subscribe to my email list click here:


Nov 7, 2024 | Gallery, More Christmas Cards |

This holiday season, let Mrs. and Mrs. Claus spread some festive cheer with a beautifully embossed card created using the Stampin’ Up Sweetest Star Bundle! With no coloring required, you can easily heat emboss the charming images in sparkling gold and then let the coordinating Sweetest Star punch do all the work for a quick and polished finish. It’s the perfect way to add a touch of magic to your holiday greetings!
DON’T MISS OUT ON THE FUN! Register for Two Card Classes to Go, one which is based on the Sweetest Star Bundle showcased here! See the details at the end of this post. Registration closes November 13!


Dimensions:
- Basic White Thick card base – 4 1/4 x 11, scored at 5 1/2
- Basic White Cardstock – 5 1/4 x 4, 4 1/4 x 2 3/4 (die-cut label)
- Cherry Cobbler and Shaded Spruce Cardstock – 4 x 3 (for cropping)
- Gold Mercury Vellum – 4 3/4 x 3 1/2

- Burnish the fold of the card base with a bone folder.
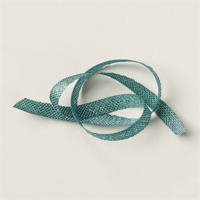
- Wrap the large Basic White layer with Shaded Spruce 1/2″ Satin & Sheer Ribbon, securing in place and to the card base with Stampin’ Dimensionals.
- Adhere the Mercury Vellum with Multipurpose Liquid Glue.
- Crop the Basic White with a Stampin’ Cut & Emboss Machine and the largest Designer Tags die.
- Stamp the sentiment in Versamark Ink onto the bottom of the tag as shown. Cover with gold WOW! Metallic Embossing Powder and set with a Heat Tool.
- Thread Cherry Cobbler & Gold Satin Ribbon through the ribbon slots and secure on the left with a bow.
- Adhere to the card with Stampin’ Dimensionals.
- Stamp the two star images (Sweetest Star Stamp Set) in Versamark Ink onto Cherry Cobbler and Shaded Spruce cardstock. Cover with gold WOW! Metallic Embossing Powder and set with a Heat Tool.
- Crop with the coordinating Sweetest Star punch.
- Adhere with Stampin’ Dimensionals.
- Embellish with gold Neutrals Adhesive-Backed Sequins.

Two Classes-to-Go & a Bonus When You Register for Both!!
Humble Home Card Class-to-Go ($35) &
Sweetest Star Bee-utiful Gift Card Holder Class-to-Go! ($40)
Register for both and get a FREE Wink of Stella Glitter Brush! – a $9 Value
Details for each class listed within registration!
Registration Open: NOW – November 13!
Please email me with any questions!
FREE TUTORIALS- I send out Weekend Inspiration every weekend that includes a handful of Card Projects with tutorials and supply lists – and yes they are free! The first card on today’s post is one of the project tutorials! I send these out to all who are on my email list. Interested in getting these project sheets? Simply subscribe to my email list click here:

Nov 2, 2024 | Gallery, More Christmas Cards |
How adorable is this “Holly Jolly: Santa? The Sweetest Star Bundle includes three charming images that are perfect for some coloring fun with your Stampin’ Blends!
Registration for Two Card Classes to Go NOW OPEN, one which is based on the Sweetest Star Bundle showcased here! See the details at the end of this post.
Dimensions:
- Basic White Thick card base – 4 1/4 x 11, scored at 5 1/2
- Basic White Card Stock – 3 3/4 x 5 (embossed), 4 x 3 (for punching)
- Basic Black Card Stock – 4 1/4 x 1/2 (snipped sentiment)

- Burnish the fold of the card base with a bone folder.
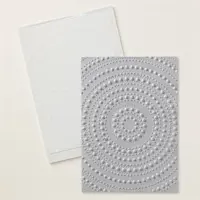
- Emboss the 3 3/4 x 5 layer with the Dotted Circles 3D Embossing Folder.
- Adhere the embossed basic white layer with Stampin’ Dimensionals.
- Stamp the Santa image in Tuxedo Black Memento Ink onto the right side of the Basic White layer.
- Crop with the coordinating punch.
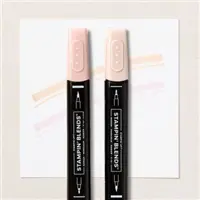
- Color with the following Stampin’ Blends Combo Packs: Cherry Cobbler, Real red, Basic Black, Smoky Slate (Light), Color Lifter, SU900 Light
- Adhere to the card with Stampin’ Dimensionals.
- Rub the Basic Black Cardstock layer with an Embossing Buddy, then stamp the sentiment in Versamark Ink.
- Cover with white WOW! Embossing Powder and set with a Heat Tool.
- Embellish with Real Red & White Adhesive-Backed Peppermints.
Two Classes-to-Go & a Bonus When You Register for Both!!
Humble Home Card Class-to-Go ($35) &
Sweetest Star Bee-utiful Gift Card Holder Class-to-Go! ($40)
Register for both and get a FREE Wink of Stella Glitter Brush! – a $9 Value
Details for each class listed within registration!
Registration Open: NOW – November 13!
Please email me with any questions!
FREE TUTORIALS- I send out Weekend Inspiration every weekend that includes a handful of Card Projects with tutorials and supply lists – and yes they are free! The first card on today’s post is one of the project tutorials! I send these out to all who are on my email list. Interested in getting these project sheets? Simply subscribe to my email list click here:

Oct 30, 2024 | Fall Cards, Gallery, More Birthday Cards, More Christmas Cards |
The Changing Leaves bundle is gorgeous! It includes a Hybrid Embossing Folder that I have fallen in love with!!! This bundle has been highly popular and you can see why with these cards!!!

Below is the video recording of my live:

My first card is monochromatic. I used a beautiful combination – Pretty Peacock, Lost Lagoon and Pool Party. This card features the stmap set alone – so pretty – I love the detailed leaves!

My second card featured the embossing folder with the Hybrid component. Be sure to watch my recording of the FB Live to see it in action. It’s easy to use and fun! The focal point of this card is the Season of Elegance Specialty Paper – it is 12″ x 12″. The combination of this paper with Basic Beige has become a favorite of mine.

The third card is a combination of the embossing folder, and the Season of Elegance DSP.

FREE TUTORIALS- I send out Weekend Inspiration every weekend that includes a handful of Card Projects with tutorials and supply lists – and yes they are free! The first card on today’s post is one of the project tutorials! I send these out to all who are on my email list. Interested in getting these project sheets? Simply subscribe to my email list click here:

Oct 25, 2024 | Gallery, More Christmas Cards, More Holiday Cards |

How lovely is this winter scene created with the Snowy Wonder Bundle by Stampin’ Up!? The mixture of trees, mountains and different shades of green are the perfect backdrop for the little cabin nestled among them.
Card Tutorial: Snowy Wonder, Let it Snow Card
Measurements:
- Crumb Cake: 5-1/2” x 8-1/2” scored at 4-1/4”, folded then burnished with the Bone Folder (card base)
- Basic White: 5 ½” x 8 ½”
- Garden Green: ½” x 1 ½”
- Linen Thread: 8”
Instructions:
- Using Crumb Cake ink, stamp speckle images across the center, front of the Crumb Cake card base. onto the 4” x 5” piece of Basic Beige cardstock and heat emboss using the clear embossing powder.
- Using the large circle die from the Stylish Shapes Dies, die cut a circle from the Basic White cardstock close to an edge. Stamp Mountain images towards the top of the circle piece using Pool Party ink, then adhere to the front of the card base over the speckled images.
- Die cut a the triangular tree from the Garden Green cardstock.
- Stamp a variety of trees using Garden Green ink onto the remaining Basic White cardstock; stamp some with the “stamp off” method to get varying shades of green. Then stamp a cabin using Early Espresso ink and the sentiment using Crumb Cake ink.
- Die cut the trees and cabin using the Snowy Wonder Dies and fussy cut the sentiment. Then adhere the trees and cabin inside the circle die in layers using various adhesives, with the top most pieces using Stampin’ Dimensionals.
- Tie a bow with the Linen Thread, attach it to the back of the sentiment, and the sentiment/bow piece to the front using Stampin’ Dimensionals.
- Attach a few White Loose Snowflakes using the Fine Tip Glue Pen.