Jun 27, 2022 | Gallery, More Bee Creative Tutorials, More Thank You Cards |

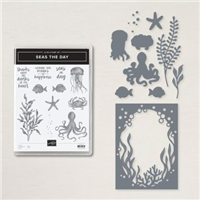
This adorable thank you card was created with the Seas the Day Bundle that retires as of Thursday, June 30, 2022 or While Supplies Last.

You can shop all retiring products in my online store HERE. NOTE: Several stamp sets and a few other items have SOLD OUT!


MEASUREMENTS:
- Basic White Thick Cardstock : 4 1/4″ x 11″, scored at 5 1/2″
- Basic White Cardstock: 4″ x 4″ (stamping/die-cutting)
- Pool Party Cardstock: 4 1/4″ x 5 1/2″

INSTRUCTIONS:
- Burnish and fold the card base with a Bone Folder.
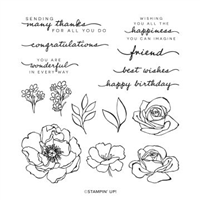
- Stamp the images in the following Classic Ink Colors: Pool Party, Fresh Freesia, and Pale Papaya
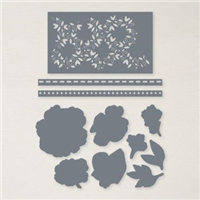
- Crop the images with a Stampin’ Cut & Emboss Machine and the coordinating Sea Dies.
- Crop the Pool Party Cardstock with the largest Stitched Rectangle Die and again with the Sea Die.
- Adhere all with Stampin’ Dimensionals.
- Stamp the sentiment in Pool Party as shown.
- Embellish with Sparkle & Shine Sequins.

Want it all?? Have a big wish list? The BEST deal is always buying the Stampin' Up! Starter Kit! You get $125 in product of your choice for just $99 & Free Shipping! No obligation
I am blessed to lead an amazing team with members all across the United States. My team consists of both business builders and happy shoppers! The question I am most often asked about joining the SU family is – “do I have to sell?” The answer is NO! You are welcome to be a happy shopper – and a smart cookie, I might add, to get all the products you love at the demonstrator discount!
Please contact me with any questions! I’d love to have you join my “We’d Rather Bee Stampin'” team!
You will then enjoy 20% off all future purchases while you are active! What have you got to lose? The link to join is below! The best part – there is no obligation to sell, or hold parties ever!!! You can simply become a “happy shopper” and get discounts on all your Stampin’ Up! purchases! If you’d like to pursue this as a business and make a little extra money, I can help you with that as well! 

Jun 13, 2022 | Gallery, More Bee Creative Tutorials, More Friend Cards |

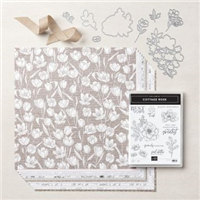
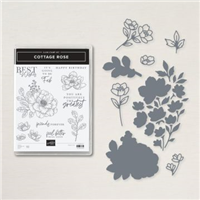
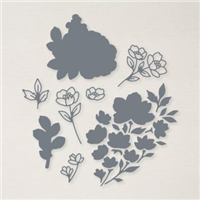
Another card and tutorial using the beautiful Abigail Rose Suite Collection from Stampin’ Up!


MEASUREMENTS:
- Very Vanilla Thick Cardstock : 4 1/2″ x 11, scored at 5 1/2″
- Very Vanilla Cardstock: 3″ x 4 1/2″ (die-cut), 3 3/4″ x 3 3/4″ (stamping)
- Gray Granite Cardstock: 3 1/2″ x 4 3/4″
- Abigail Rose DSP – 3 1/4″ x 4 1/2″

INSTRUCTIONS:
- Burnish and fold the card base with a Bone Folder.
- Adhere the DSP and Gray Granite together and to the card.
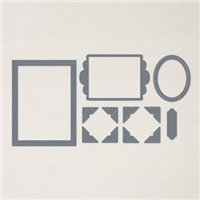
- Crop a piece of Very Vanilla Cardstock with a Stampin’ Cut & Emboss Machine and the Fabulous Frames dies. Adhere with dimensionals.
- Stamp the flower and sentiment in Gray Granite Classic Ink onto Very Vanilla.
- Color with Pale Papaya, Old Olive, and Soft Suede Stampin’ Blends.
- Use a Stampin’ Cut & Emboss Machine along with the Cottage Flowers die to crop the floral image. Adhere with dimensionals.
- Trim the sentiment to size with a Paper Trimmer and snip the end at an angle with Paper Snips.
- Adhere a bow of Gray Granite Baker’s Twine with a Mini Glue Dot.
- Embellish with Vanilla Classic Matte Dots.
Want it all?? Have a big wish list? The BEST deal is always buying the Stampin' Up! Starter Kit! You get $125 in product of your choice for just $99 & Free Shipping! No obligation
I am blessed to lead an amazing team with members all across the United States. My team consists of both business builders and happy shoppers! The question I am most often asked about joining the SU family is – “do I have to sell?” The answer is NO! You are welcome to be a happy shopper – and a smart cookie, I might add, to get all the products you love at the demonstrator discount!
Please contact me with any questions! I’d love to have you join my “We’d Rather Bee Stampin'” team!
You will then enjoy 20% off all future purchases while you are active! What have you got to lose? The link to join is below! The best part – there is no obligation to sell, or hold parties ever!!! You can simply become a “happy shopper” and get discounts on all your Stampin’ Up! purchases! If you’d like to pursue this as a business and make a little extra money, I can help you with that as well!

Jun 6, 2022 | Gallery, More Bee Creative Tutorials, More Friend Cards |

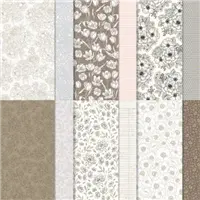
The NEW 2022-2023 Annual Catalog is filled with jaw-dropping products that I just can’t get enough of! This simple gatefold card packs a punch and introduces you to the Abigail Rose Suite Collection.
MEASUREMENTS:
- Crumb Cake Cardstock : 8 1/2 x 5 1/2″. Score at 2 1/8 and 6 3/8″.
- Basic White: 4″ x 5 1/4″ (inside), 2 3/4″ x 2 3/4″ (die-cut)
- Abigail Rose DSP – 2″ x 10″ (belly-band), snipped flowers

INSTRUCTIONS:
- Burnish and fold the card base with a Bone Folder.
- Adhere the Basic White Cardstock to the inside of the card.
- Snip the flowers from the edge of the Abigail Rose Designer Series Paper. Adhere to the outside folds as shown.
- Wrap the card (loosely) with a 2″ x 10″ piece of Abigail Rose Designer Series Paper, adhering on the front of the card (so the seam is covered by the sentiment).
- Wrap the belly-band with the Natural Finish 7/8″ Ribbon. Tie in a bow to secure.
- Stamp the sentiment in Petal Pink Ink.
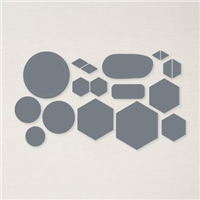
- Use a Stampin’ Cut & Emboss Machine along with the Beautiful Shapes large circle embossed die to crop the sentiment. Adhere with dimensionals.
- Embellish with Polished Dots.

Want it all?? Have a big wish list? The BEST deal is always buying the Stampin' Up! Starter Kit! You get $125 in product of your choice for just $99 & Free Shipping! No obligation
I am blessed to lead an amazing team with members all across the United States. My team consists of both business builders and happy shoppers! The question I am most often asked about joining the SU family is – “do I have to sell?” The answer is NO! You are welcome to be a happy shopper – and a smart cookie, I might add, to get all the products you love at the demonstrator discount!
Please contact me with any questions! I’d love to have you join my “We’d Rather Bee Stampin'” team!
You will then enjoy 20% off all future purchases while you are active! What have you got to lose? The link to join is below! The best part – there is no obligation to sell, or hold parties ever!!! You can simply become a “happy shopper” and get discounts on all your Stampin’ Up! purchases! If you’d like to pursue this as a business and make a little extra money, I can help you with that as well!

May 31, 2022 | Gallery, More Bee Creative Tutorials, More Friend Cards |
We all love fun fold cards and this “faux” side step card doesn’t disappoint! It features popular products from the Hues of Happiness Suite – they are just gorgeous!
This card looks difficult, but it’s not as difficult as it looks – it defintely packs a “wow!” I hope you will give it a try!


MEASUREMENTS:
- Pool Party CS: 4-1/4” x 9”, then scored at 1-1/4”, 2-1/2”, and 5-3/4”; 2-1/2” x 8-1/2”, then scored at 5-1/2”
- Basic White CS: 4” x 3”; plus a scrap for the sentiment
- DSP: 2-1/4” x 5-1/4”; 4” x 3”; 4” x 1”
INSTRUCTIONS:
- Stamp the front sentiment in Night of Navy ink onto a scrap of Basic White CS.
- Use Paper Snips to fussy cut the sentiment.
- Stamp the back sentiment in Coastal Cabana ink onto the 4” x 3” Basic White CS.
- Stamp two roses in the bottom corners of the same Basic White CS.
- Die cut 5 flowers and 3 leaves from a piece of DSP.
- Burnish the folds of the 4-1/4” x 9” Pool Party CS with a Bone Folder, so the middle one is a valley fold, and the outer two are mountain folds. Turn so the two larger sections are at the top and the two smaller sections are at the bottom
- Burnish the fold in the 2-1/2” x 8-1/2” Pool Party CS. Turn so the smaller section is at the top and the larger section is at the bottom.
- Glue the 4” x 1” piece of DSP onto the bottom section of the 4-1/4” x 9” piece of Pool Party CS.
- Glue the 4” x 3” piece of DSP onto the lower of the two larger sections (second section from the top; third section from the bottom) of the 4-1/4” x 9” Pool Party CS.
- Glue the 2-1/4“ x 5-1/4” piece of DSP onto the larger/bottom section of the 2-1/2” x 8-1/2” Pool Party CS.
- Lay the 2-1/2” x 8-1/2 Pool Party CS on top of the 4-1/4” x 9” Pool Party CS, centering it left to right, and lining up the bottom edges. Glue just the bottom inch of the skinnier piece onto the bottom section of the wider piece.
- Accordion fold the wider card base piece, then flip it over to the back. Make sure the whole thing is pressed flat.
- Fold down the top end of the skinnier piece onto the back of the wider piece. It should overlap about 3/4”. Glue only where the two pieces overlap
- Glue the 4” x 3” Basic White CS onto the back of the card base, covering the end of the overlapping 2-1/2” wide Pool Party CS.
- On the front, glue the sentiment at the top of the 2-1/4” x 5-1/4” DSP.
- Arrange the die cut flowers and leaves on the same piece of DSP, and adhere them using pieces of Foam Adhesive Sheets.
- Apply two Glossy Dots onto the centers of the two largest flowers, and 3 onto the surrounding DSP, using a Take Your Pick tool.
- Tie a small bow with the ribbon and trim the ends with Snips. Adhere onto the card front using Mini Glue Dots.
- If you have a lot to write to the recipient, you can cut one or two more pieces of Basic White CS to 4” x 3”, and glue them onto the inside of the card base. Since the card doesn’t open completely, it’s best to write on them before gluing them.

Want it all?? Have a big wish list? The BEST deal is always buying the Stampin' Up! Starter Kit! You get $125 in product of your choice for just $99 & Free Shipping! No obligation
I am blessed to lead an amazing team with members all across the United States. My team consists of both business builders and happy shoppers! The question I am most often asked about joining the SU family is – “do I have to sell?” The answer is NO! You are welcome to be a happy shopper – and a smart cookie, I might add, to get all the products you love at the demonstrator discount!
Please contact me with any questions! I’d love to have you join my “We’d Rather Bee Stampin'” team!
You will then enjoy 20% off all future purchases while you are active! What have you got to lose? The link to join is below! The best part – there is no obligation to sell, or hold parties ever!!! You can simply become a “happy shopper” and get discounts on all your Stampin’ Up! purchases! If you’d like to pursue this as a business and make a little extra money, I can help you with that as well!
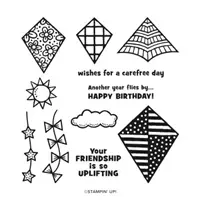
May 16, 2022 | Gallery, More Bee Creative Tutorials, More Friend Cards |

My card today features the whimsical Kite Delight stamp set from our January to June Mini Catalog. It sure feels like summer – and this stamp set is perfect for a light hearted, fun card!
You have seen me use this layout before – it’s one of my favorites – I love the scallop edge created by the Scallop Contour Dies!
Measurements:
- Thick Basic White: 5 ½” x 8 ½”, scored at 4 1/4″
- Basic White: 3 ¼” x 5 ¼”, 2 ½ square
- Daffodil Delight: ½” x 3”
- Just Jade: 1” x 5 ¼”
- DSP: 1” x 5 ¼”
- Black Twine: about 6”
Instructions:
- Burnish and fold the card base with a Bone Folder
- Use the Stampin’ Cut and Emboss Machine to crop the Scallop with the Scallop Contour dies with Just Jade cardstock.
- Emboss the 3 1/4″ x 5 1/4″ panel with the Stampin’ Cut and Emboss Machine and the Dots Embossing Folder.
- Stamp the kite onto the Basic White Square – cut with Paper Snips. Add color with Stampin’ Blends.
- Stamp the words onto the panel of Daffodil Delight.
- Assemble the card – adhere the plaid DSP onto the right edge of the card front, then adhere the scalloped panel.
- Attach the Polka Dot panel with dimensionals.
- Tie several knots into the length of Black Baker’s Twine- use a dimensional on the back of the kite to secure the twine. Add additional dimensionals to pop up kite and attach to card front.
- Tie a bow in a small length of Baker’s Twine and attach to kite as shown in photo with a glue dot.
- Attach word panel over kite string with dimensionals.
Want it all?? Have a big wish list? The BEST deal is always buying the Stampin' Up! Starter Kit! You get $125 in product of your choice for just $99 & Free Shipping! No obligation
I am blessed to lead an amazing team with members all across the United States. My team consists of both business builders and happy shoppers! The question I am most often asked about joining the SU family is – “do I have to sell?” The answer is NO! You are welcome to be a happy shopper – and a smart cookie, I might add, to get all the products you love at the demonstrator discount!
Please contact me with any questions! I’d love to have you join my “We’d Rather Bee Stampin'” team!
You will then enjoy 20% off all future purchases while you are active! What have you got to lose? The link to join is below! The best part – there is no obligation to sell, or hold parties ever!!! You can simply become a “happy shopper” and get discounts on all your Stampin’ Up! purchases! If you’d like to pursue this as a business and make a little extra money, I can help you with that as well!

May 2, 2022 | Gallery, More Bee Creative Tutorials, More Friend Cards |

The NEW 2022-2023 Annual Catalog is set to launch tomorrow, May 3, 2022, and my card today introduces the gorgeous Hues of Happiness Suite Collection! The paper is jaw-dropping! It’s all you need to make a beautiful quick card.
MEASUREMENTS:
- Basic White Thick: 4 1/4″ x 11″. Score at 5 1/2″.
- Basic White: 3 x 3″ (die-cut), 3/4″ x 2 1/2″ (stamping)
- Hues of Happiness DSP – 4 x 5 1/4″, die-cut flowers & leaves

INSTRUCTIONS:
- Burnish and fold the card base with a Bone Folder.
- Use a Stampin’ Cut & Emboss Machine and the Fabulous Frames Die to crop the piece of Hues of Happiness Designer Series Paper.
- Adhere the die-cut frame to the card base with Stampin’ Dimensionals.
- Cut 1/8″ off each side of the rectangle die-cut and adhere to the center of the frame with Multipurpose Liquid Glue.
- Crop the Basic White Cardstock with the 2 1/2″ circle from the Stylish Shapes Dies. Adhere with Stampin’ Dimensionals.
- Crop the flowers and leaves from the Hues of Happiness Designer Series Paper with the coordinating Blossoming Happiness Dies. Adhere with Multipurpose Liquid Glue.
- Stamp the sentiment in Melon Mambo Classic Ink onto the piece of Basic White Cardstock. Cut the end at an angle with Paper Snips. Adhere with Stampin’ Dimensionals.
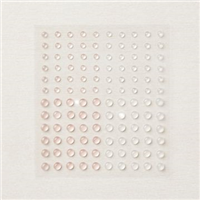
- Embellish with Melon Mambo Solid Faceted Gems.
Want it all?? Have a big wish list? The BEST deal is always buying the Stampin' Up! Starter Kit! You get $125 in product of your choice for just $99 & Free Shipping! No obligation
I am blessed to lead an amazing team with members all across the United States. My team consists of both business builders and happy shoppers! The question I am most often asked about joining the SU family is – “do I have to sell?” The answer is NO! You are welcome to be a happy shopper – and a smart cookie, I might add, to get all the products you love at the demonstrator discount!
Please contact me with any questions! I’d love to have you join my “We’d Rather Bee Stampin'” team!
You will then enjoy 20% off all future purchases while you are active! What have you got to lose? The link to join is below! The best part – there is no obligation to sell, or hold parties ever!!! You can simply become a “happy shopper” and get discounts on all your Stampin’ Up! purchases! If you’d like to pursue this as a business and make a little extra money, I can help you with that as well!