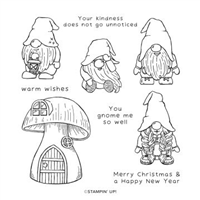
Aug 22, 2022 | Gallery, More Bee Creative Tutorials, More Christmas Cards |

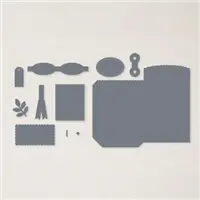
A simple and cute holiday card with the adorable Kindest Gnomes Bundle by Stampin’ Up!

MEASUREMENTS:
- Basic White Thick Cardstock: 5 1/2″ x 8 1/2″ scored at 4 1/4″
- Basic White Cardstock: 5 1/2″ x 4″ (layer), 2″ x 2″ (die-cutting)
- Sweet Sorbet Cardstock: 5 1/2″ x 2″ (layer)
- Pool Party Cardstock: 3 1/4″ x 3 1/4″ (die-cutting)
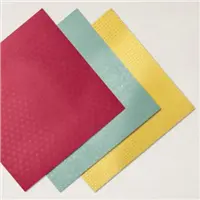
- Petal Pink Cardstock: scrap for die-cutting nose Sweetest Christmas DSP: 5 1/2″ x 1 3/4″ (layer), 3″ x 3″ (die-cutting)

INSTRUCTIONS:
- Burnish and fold the card base with a Bone Folder.
- Stamp the sentiment in Sweet Sorbet Classic Ink onto the Basic White layer as shown. Adhere with dimensionals.
- Adhere the DSP layer to the Sweet Sorbet Cardstock Layer together with Liquid Glue.
- Double wrap with White Baker’s Twine, finish with a bow. Adhere to card with Liquid Glue.
- Crop the Pool Party Cardstock with the largest Stylish Labels Circle Die. Adhere with dimensionals.
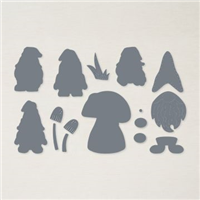
- Use the Gnomes Dies to crop the hat and feet (Sweetest Christmas DSP), beard (Basic White), nose (Petal Pink). Adhere together with Liquid Glue.
- Adhere to the card as shown with dimensionals.
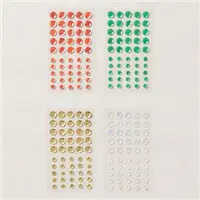
- Embellish with Fine Sparkle Adhesive-Backed Gems.

Want it all?? Have a big wish list? The BEST deal is always buying the Stampin' Up! Starter Kit! You get $125 in product of your choice for just $99 & Free Shipping! No obligation
I am blessed to lead an amazing team with members all across the United States. My team consists of both business builders and happy shoppers! The question I am most often asked about joining the SU family is – “do I have to sell?” The answer is NO! You are welcome to be a happy shopper – and a smart cookie, I might add, to get all the products you love at the demonstrator discount!
Please contact me with any questions! I’d love to have you join my “We’d Rather Bee Stampin'” team!
You will then enjoy 20% off all future purchases while you are active! What have you got to lose? The link to join is below! The best part – there is no obligation to sell, or hold parties ever!!! You can simply become a “happy shopper” and get discounts on all your Stampin’ Up! purchases! If you’d like to pursue this as a business and make a little extra money, I can help you with that as well! 

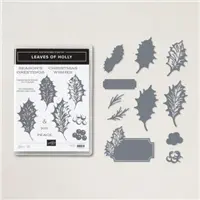
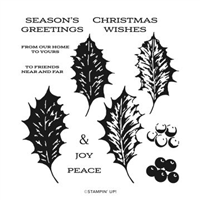
Aug 18, 2022 | Gallery, More Bee Creative Tutorials, More Christmas Cards |

A lovely card created with the detailed stamp images of the Leaves of Holly Stamp Set by Stampin’ Up!
MEASUREMENTS:
- Basic White Cardstock Thick: 5 1/2″ x 8 1/2″ scored at 4 1/4″
- Basic White Cardstock: 5 1/4″ x 4″ (layer), 5″ x 5″ (stamping and die-cutting), 3 1/2″ x 3 1/2″ (sentiment)
- Cherry Cobbler Cardstock: 5 3/8″ x 4 1/8″ (layer), 3 1/4″ square

INSTRUCTIONS:
- Burnish and fold the card base with a Bone Folder.
- Adhere the Cherry Cobbler layer with dimensionals.
- Stamp the holly leaves around the edge of Basic White in Mossy Meadow Classic Ink (the bottom layer is stamped off first for a lighter color).
- Adhere to the Cherry Cobbler Layer with Liquid Glue.
- Crop the Cherry Cobbler Cardstock with the largest Stylish Labels Circle Die. Adhere with dimensionals.
- Stamp three holly leaves onto Basic White in Mossy Meadow Classic Ink (the bottom layer is stamped off first for a lighter color) and the berries in Cherry Cobbler Classic Ink (the bottom layer is stamped off first for a lighter color).
- Stamp the sentiment in Cherry Cobbler Classic Ink.
- Crop all with a Stampin’ Cut & Emboss Machine and the coordinating Holly Berry Dies.
- Adhere all as shown with Stampin’ Dimensionals.
- Embellish with Festive Pearls.
Want it all?? Have a big wish list? The BEST deal is always buying the Stampin' Up! Starter Kit! You get $125 in product of your choice for just $99 & Free Shipping! No obligation
I am blessed to lead an amazing team with members all across the United States. My team consists of both business builders and happy shoppers! The question I am most often asked about joining the SU family is – “do I have to sell?” The answer is NO! You are welcome to be a happy shopper – and a smart cookie, I might add, to get all the products you love at the demonstrator discount!
Please contact me with any questions! I’d love to have you join my “We’d Rather Bee Stampin'” team!
You will then enjoy 20% off all future purchases while you are active! What have you got to lose? The link to join is below! The best part – there is no obligation to sell, or hold parties ever!!! You can simply become a “happy shopper” and get discounts on all your Stampin’ Up! purchases! If you’d like to pursue this as a business and make a little extra money, I can help you with that as well!

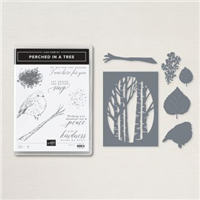
Aug 17, 2022 | Gallery, More Bee Creative Tutorials, More Love Cards |

For my Facebook Live this week, I wanted to showcase the Perched in a Tree bundle – and specifically the Aspen Tree Dies – because they are now one of the FREE Saleabration Rewards you can select with a qualifying $100 product purchase. We all love free, right? These dies are found in the July-December Mini Catalog and are priced at $36 so to get them for free is great!
Watch the video below to see how I made these cards. They are very different – but from the same bundle – showing the versatility of these products!

For my first card, I used a Starry Sky card base, and then added a 4″ x 5 1/4″ panel of Basic White. I ran a piece of the White Glimmer Paper through my Stampin’ Cut and Emboss Machine with the Aspen Tree die – wanting to create a wintry, snowy look! I also cropped the branch with the White Glimmer Paper. I mounted this onto the Basic White cardstock – using a lot of dimensionals – making certain this panel would pop!

The sweet chubby bird was stamped in Tuxedo Black Memento Ink onto a piece of Basic White cardstock, and cropped with the coordinating die. A bit of color was added to the bird with the “splatter” stamp in the Perched in a Tree stamp set along with some Starry Sky ink. I inked up the bird, stamped off onto scrap paper and then lightly tapped the stamp to the bird. This is a great way to add a little color quickly!

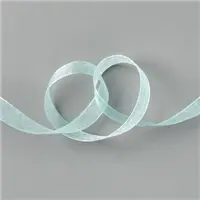
The second card I made uses the Aspen Leaves from the die set – so pretty! This card has a very soft color palette – Pool Party, Soft Sea Foam and Basic White. The Designer Paper strips are from the beautiful Splendid Day Specialty Paper.
I used two strips of the Soft Seafoam DSP, and then added a strip of Pool Party Ribbon. I love the softness that the ribbon adds.

FREE TUTORIALS- I send out Weekend Inspiration every weekend that includes a handful of Card Projects with tutorials and supply lists – and yes they are free! The first card on today’s post is one of the project tutorials! I send these out to all who are on my email list. Interested in getting these project sheets? Simply subscribe to my email list click here:

Want it all?? Have a big wish list? The BEST deal is always buying the Stampin' Up! Starter Kit! You get $125 in product of your choice for just $99 & Free Shipping! No obligation
I am blessed to lead an amazing team with members all across the United States. My team consists of both business builders and happy shoppers! The question I am most often asked about joining the SU family is – “do I have to sell?” The answer is NO! You are welcome to be a happy shopper – and a smart cookie, I might add, to get all the products you love at the demonstrator discount!
Please contact me with any questions! I’d love to have you join my “We’d Rather Bee Stampin'” team!
You will then enjoy 20% off all future purchases while you are active! What have you got to lose? The link to join is below! The best part – there is no obligation to sell, or hold parties ever!!! You can simply become a “happy shopper” and get discounts on all your Stampin’ Up! purchases! If you’d like to pursue this as a business and make a little extra money, I can help you with that as well!


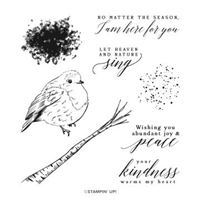
Aug 15, 2022 | Gallery, More Bee Creative Tutorials, More Friend Cards |

MEASUREMENTS:
- Basic White:
- 5-1/2” x 8-1/2”, scored at 4-1/4”
- 4” x 5-1/4”
- 1” x 4”
- 3” x 3” (for die-cutting)
- Festive Foils paper: 3-7/8” x 5-1/8”
INSTRUCTIONS:
- Fold the Basic White cardstock in half at the score line to create your card base.
- Run the 4” x 5-1/4” piece of Basic White cardstock through the Cut & Emboss Machine using the Aspen Die frame that comes in the Bundle.
- Adhere the Festive Foils paper to the back side of the die-cut frame so that it shows through the front side. Adhere to the card base using adhesive.
- Stamp the branch onto the 1” x 4” piece of Basic White cardstock using Smoky Slate ink. Stamp the sentiment on the right side, over the end of the branch, using Evening Evergreen ink. Adhere to the base card using adhesive.
- Stamp the bird image onto the 3” scrap of Basic White cardstock using Evening Evergreen ink. Color in using the Soft Succulent and Dark Daffodil Delight Blends.
- Cut out the bird using the Aspen Tree dies that come in the Bundle. Adhere to card using Stampin’ Dimensionals to finish.
Want it all?? Have a big wish list? The BEST deal is always buying the Stampin' Up! Starter Kit! You get $125 in product of your choice for just $99 & Free Shipping! No obligation
I am blessed to lead an amazing team with members all across the United States. My team consists of both business builders and happy shoppers! The question I am most often asked about joining the SU family is – “do I have to sell?” The answer is NO! You are welcome to be a happy shopper – and a smart cookie, I might add, to get all the products you love at the demonstrator discount!
Please contact me with any questions! I’d love to have you join my “We’d Rather Bee Stampin'” team!
You will then enjoy 20% off all future purchases while you are active! What have you got to lose? The link to join is below! The best part – there is no obligation to sell, or hold parties ever!!! You can simply become a “happy shopper” and get discounts on all your Stampin’ Up! purchases! If you’d like to pursue this as a business and make a little extra money, I can help you with that as well!

Aug 11, 2022 | Gallery, More Bee Creative Tutorials, More Love Cards |

I did a quick Facebook Live yesterday to show how easy it is to make a pretty coordinating envelope for a card. In this case, it coordinates with the card I made on Tuesday.
Watch the video below to see how I made it!

Measurements for the envelope – 8″ x 9 1/2″
score along the 8″ side at 1/2″ and 6 1/4″
Score along the 9 1/2″ side at 2 1/2″ and 7″

I used the Scallop Contour dies to create a label for the front of the envelope. I die cut the same die in both Soft Suede and Basic White. I cut the scalloped edge off of the white piece and adhered it to the Soft Suede panel. I thought it was a perfect way to frame the address.
In case you missed it, here is the card I made on Tuesday.

I had some technical difficulties during my Facebook Live on Monday – but luckily was able to keep a recording. This video shows you how the coordinating card goes together! You can watch the replay to see how to use the Hybrid Embossing folder.

FREE TUTORIALS- I send out Weekend Inspiration every weekend that includes a handful of Card Projects with tutorials and supply lists – and yes they are free! The first card on today’s post is one of the project tutorials! I send these out to all who are on my email list. Interested in getting these project sheets? Simply subscribe to my email list click here:

Want it all?? Have a big wish list? The BEST deal is always buying the Stampin' Up! Starter Kit! You get $125 in product of your choice for just $99 & Free Shipping! No obligation
I am blessed to lead an amazing team with members all across the United States. My team consists of both business builders and happy shoppers! The question I am most often asked about joining the SU family is – “do I have to sell?” The answer is NO! You are welcome to be a happy shopper – and a smart cookie, I might add, to get all the products you love at the demonstrator discount!
Please contact me with any questions! I’d love to have you join my “We’d Rather Bee Stampin'” team!
You will then enjoy 20% off all future purchases while you are active! What have you got to lose? The link to join is below! The best part – there is no obligation to sell, or hold parties ever!!! You can simply become a “happy shopper” and get discounts on all your Stampin’ Up! purchases! If you’d like to pursue this as a business and make a little extra money, I can help you with that as well!

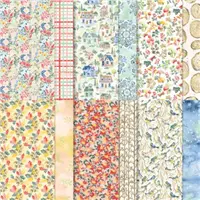
Aug 10, 2022 | Gallery, More Bee Creative Tutorials, More Love Cards |
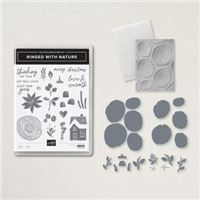
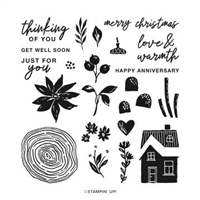
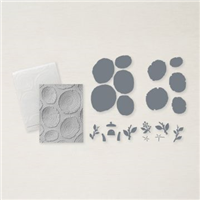
I had some technical difficulties during my Facebook Live yesterday – but luckily was able to keep a recording. I’m sharing it below! For this Live, I shared the Ringed with Nature Bundle – and the super cool Hybrid Embossing Folder. There are several ways to use this folder – and each way is easy once you see how it works!
You can watch the replay to see how to use the Hybrid Embossing folder and also how this card goes together:
Also featured in my card is the free Saleabration offering- Rings of Love Designer Series Paper. It coordinates beautifully with the Ringed with Nature bundle.
I am featuring this bundle in my Class to Go – registration ends today!

VIEWING THIS POST BY EMAIL? To register, please EMAIL ME for a registration link!
FREE TUTORIALS- I send out Weekend Inspiration every weekend that includes a handful of Card Projects with tutorials and supply lists – and yes they are free! The first card on today’s post is one of the project tutorials! I send these out to all who are on my email list. Interested in getting these project sheets? Simply subscribe to my email list click here:
Want it all?? Have a big wish list? The BEST deal is always buying the Stampin' Up! Starter Kit! You get $125 in product of your choice for just $99 & Free Shipping! No obligation
I am blessed to lead an amazing team with members all across the United States. My team consists of both business builders and happy shoppers! The question I am most often asked about joining the SU family is – “do I have to sell?” The answer is NO! You are welcome to be a happy shopper – and a smart cookie, I might add, to get all the products you love at the demonstrator discount!
Please contact me with any questions! I’d love to have you join my “We’d Rather Bee Stampin'” team!
You will then enjoy 20% off all future purchases while you are active! What have you got to lose? The link to join is below! The best part – there is no obligation to sell, or hold parties ever!!! You can simply become a “happy shopper” and get discounts on all your Stampin’ Up! purchases! If you’d like to pursue this as a business and make a little extra money, I can help you with that as well!